Updated: Adding Third-Party Libraries to Unreal Engine : NASA's SPICE Toolkit (Part 5)
Note: This is the last post of a 5 part series.
Previous Post : Adding Third-Party Libraries - Part 4
Welcome to…. PART 5!
If you’re in a hurry and you’d like to skip to the code, see Getting Started.
A long LONG time ago, like a month ago…
We defined our goal: integrate Unreal Engine 5 and a 3rd party library, NASA’s SPICE toolkit (Part 1)
We considered our options on how to go about the integration (Part 2).
We created a build system that builds SPICE as a UE Module (Part 3).
We exposed the library’s specific functionality by creating SPICE UE5 data types and SPICE UE5 Blueprint nodes (Part 4).
(And, we probably watched Don’t Look Up on Netflix, but the first thing we wanted to do when someone told us not to look up was look up.)
As you can see, we’ve been going from very general topics (UE/3rd party libraries in general) towards very specific topics (EARTH, JUPITER, IO, “Comet Dibiasky”, CASSINI, JWST, etc).
We have a functioning UE5 SPICE toolkit module. So, now what?

1. We could focus on 3rd party library modules in general.
How would we turn a module into plugin?
How are plugins submitted to Epic’s Unreal Engine marketplace?

2. Do SPICE space stuff… in UE5.
How do we pull data out of spice to get the dimensions of Earth, Mars, Moon, etc?
What Longitude/Latitude/Altitude is the Hubble Space Telescope at right now?
What else can we do with all this space math?
Etc. Etc. Etc.
3. Space 101 for Game Developers and other UE5 users
What does “Barycenter” mean? Is it bad if our solar system has one? And if so… How long do we have left?
What is a “SPK ID?”
Etc. Etc. Etc.

4. We could do Unreal Engine 101 for Rocket Scientists.
Been using SPICE for years? Already have a ton of domain knowledge in the “space” space? Curious about the power of Unreal Engine 5?
Your C-compiler & command-lines always printing more to STDERR than STDOUT? There’s got to be a better way :/.
And now there is!
Act NOW, and for the low, low price of $0.00, we’ll answer such questions as:
How can I use SPICE without writing any code?
Is a ‘shader’ kinda like a coconut? Because my engine says its cooking those.

Overwhelming, right?
This is a lot of stuff! We can’t possibly learn all this stuff. Right? So, we’re not going to learn any of it.
Kidding. We’re going to learn a bunch, mkay?
If you’re new to Unreal Engine or new to Aero/Astro concepts you’ll find that yes, these are complex topics and it takes more than a minute to learn how everything works. But, to get started you don’t need to know how anything works at all. You just need to know that it does work. It’s easy to animate a whole solar system in Unreal Engine. A single blueprint action can move whole planets. To use it, you don’t need to know how any of the astronautical math works, only how to wire a couple of Blueprint actions. Just like, you don’t need to know everything about how Unreal Engine and its math work to load the editor and start making some Blueprints. You will learn and it’s a lot of fun.
Chances are you’ll see a bunch of stuff you don’t know much or anything about. That’s okay! I’ve made sure it is easy for you to step into this. This post is in tutorial form, with a series of Blueprint Challenges to try solving yourself. If you get stuck or just want to see examples in the blueprints editor without making anything it’s your lucky day. There is a “Copy To Clipboard” button for nearly everything discussed. Click the button, then you can paste an entire preassembled Blueprint into the editor, watch it work, take it apart, or whatnot. And that way, you can spin up in a way that’s engaging and fun. You ready? I sure am!
Let’s get started!
Getting Started
We’ll start off very detailed, step by step, just to make sure you get off the ground.
Unreal Engine 5
Of course, you’ll need Unreal Engine 5.
Unreal Engine 5.x
https://www.unrealengine.com/en-US/unreal-engine-5
In this series we integrated NASA/JPL/NAIF’s SPICE Library with Unreal Engine. The result: MaxQ Spaceflight Toolkit.
MaxQ is an Unreal Engine plugin, available from the Unreal Engine Marketplace. It is free to use for any purpose. (Yay!) To install, visit the MaxQ Spaceflight Toolkit marketplace page here:
MaxQ Spaceflight Toolkit
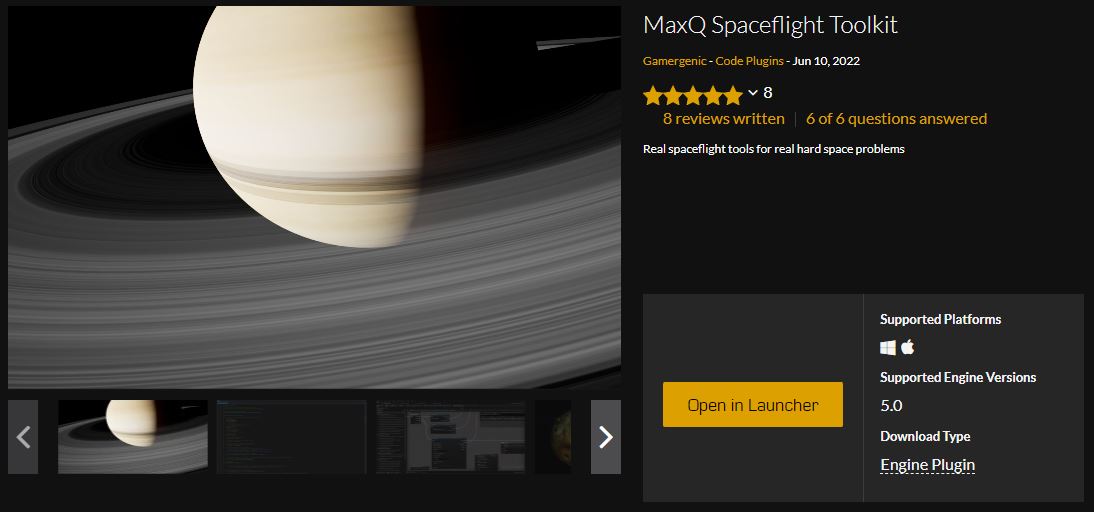
Open the project’s page in the UE Launcher via the “Open in Launcher” button.
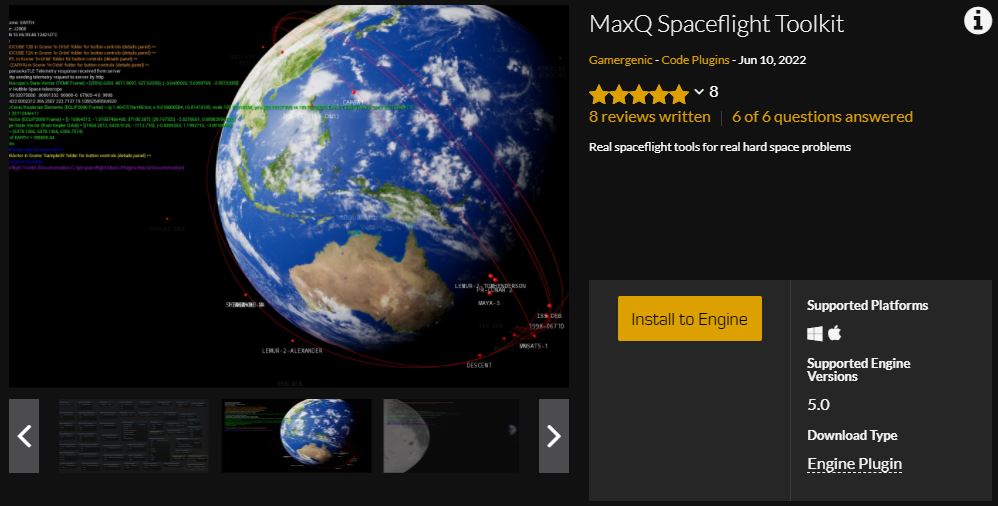
MaxQ is a powerful extension to Unreal Engine, and available for you to use for any purpose at zero cost. Don’t forget to leave a review to help other users decide whether or not it would be of benefit to them.
The Unreal Editor awaits you
After you’ve installed MaxQ launch the Unreal Engine Editor into either a new or existing project. You can then enable MaxQ from the Plugins Settings Page (Edit->Plugins).
You’ll find the Project listed under “Installed/Spaceflight”.

You’ll need to restart the editor after enabling MaxQ.
SPICE Blueprint Actions (SPICE, Finally!)
Let’s start blueprinting some stuff! You’re now no doubt looking at an empty level, Untitled, and viewing the level’s Viewport, which has nothing in the world.
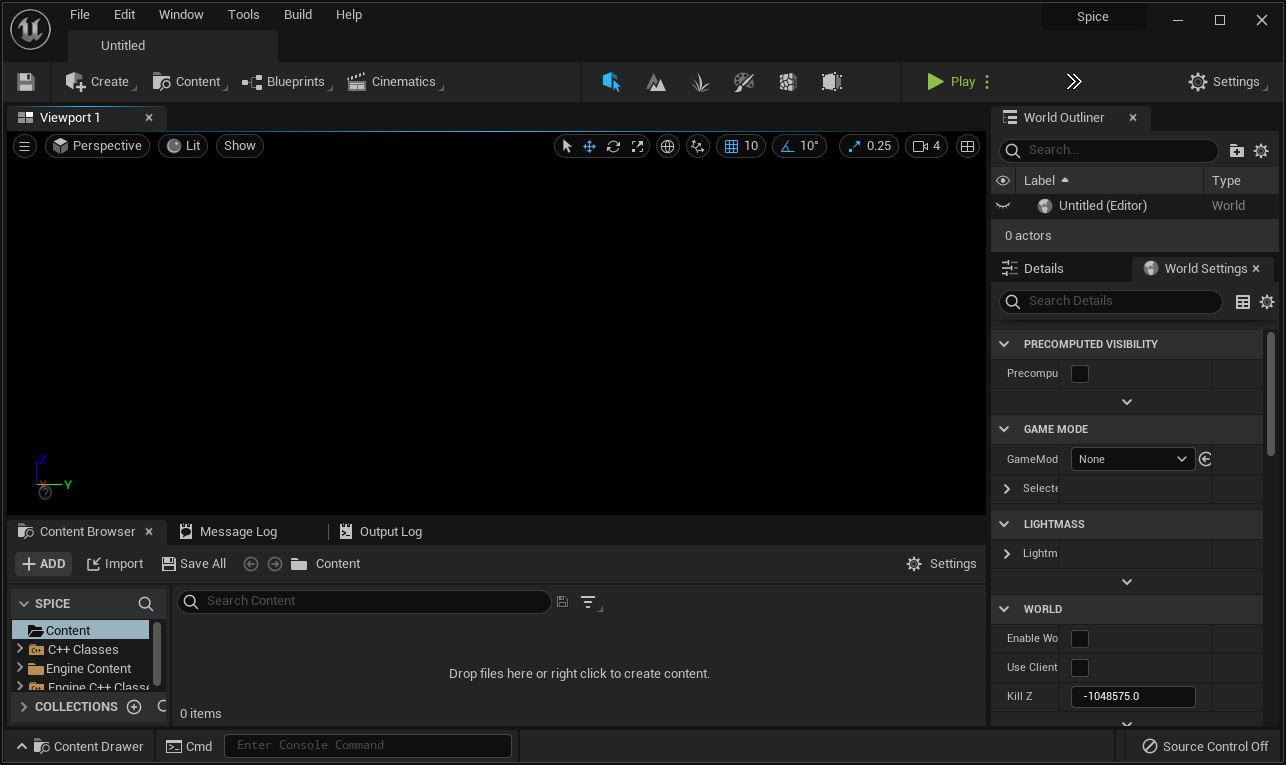
For a quick place to start making some blueprints we can just edit the Level Blueprint.
At the top of the screen click the Blueprints Icon, then Open Level Blueprint.
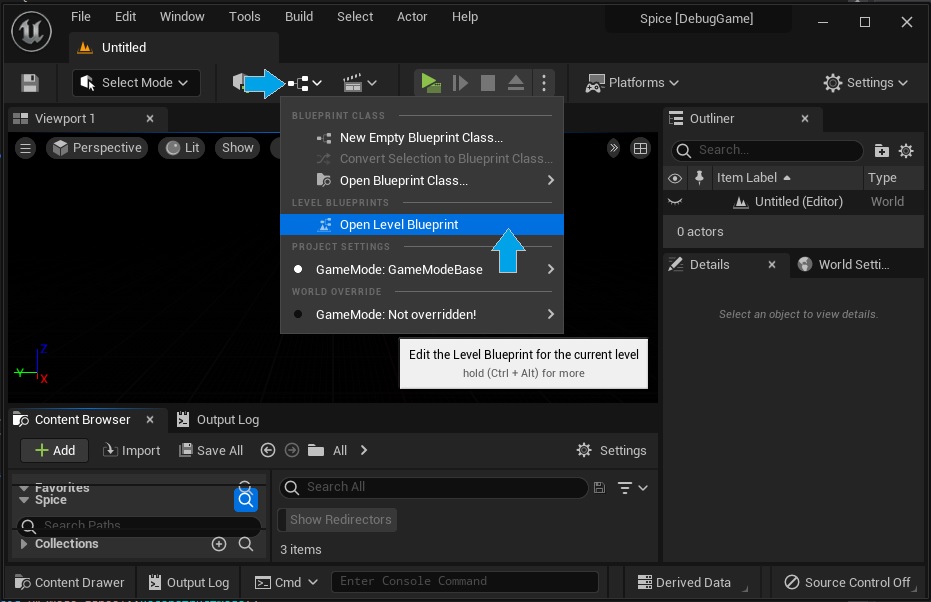
You’ll now have a new window, Untitled, which will be a view of the level’s Event Graph. Some people find it more convenient to dock this (and all other) windows to the original window, the Viewport. Suit yourself :).
Init All
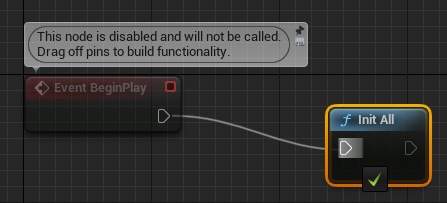
Find the Event BeginPlay node in the event graph, then right-click near it. Type maxq init all into the search box and you’ll find the first action you need to know about.
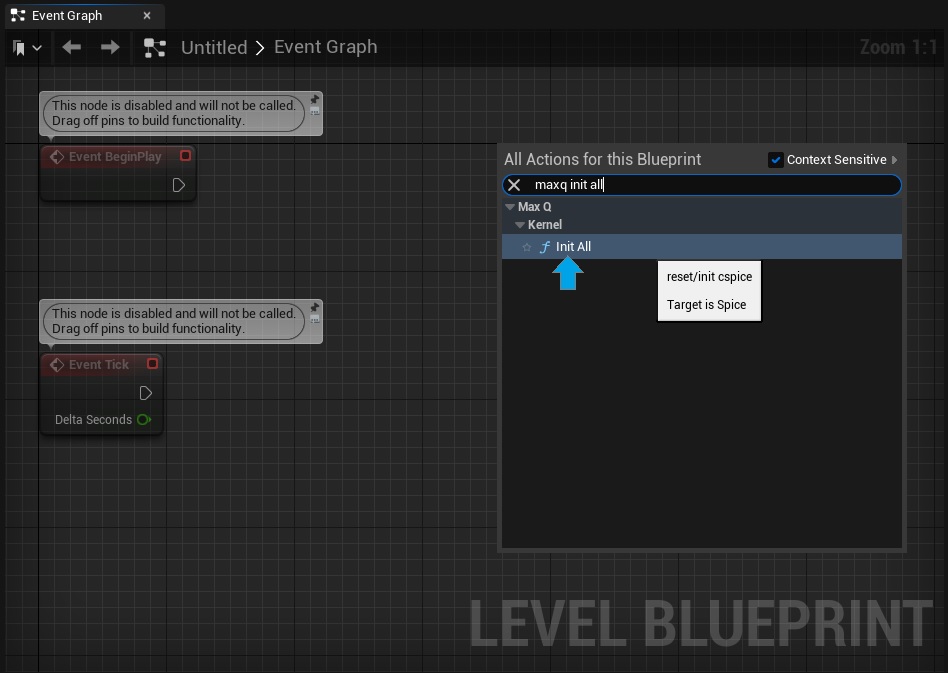
Select it to create an instance of the action, and then connect the Event BeginPlay’s white execution pin to the white execution pin on this node.
Create a level Blueprint that reinitializes SPICE upon the level’s BeginPlay event. Test it by Playing the level.
Next, try using the button below to copy the solution Blueprint.
Do you see a helpful comment in the pasted Blueprint?
As you may have guessed, Init All resets the MaxQ SPICE module. SPICE keeps a lot of global data around, such as kernel data, etc. Any/all SPICE actions all access the same SPICE state. So, the first thing you’ll want to do with SPICE, on this global level - is Reinitialize it. This unloads all previously loaded data, resets any error state, etc. It’s as close to a fresh start as we can come. Remember - if you’re running in the editor SPICE stays loaded between runs, so Kernels will stick around if you don’t do something.
C++ developers should remember the ONLY Unreal Engine module that should access the SPICE Static Library module (ThirdParty/CSpice_Library) is the Spice module. This is because each module will be statically linked to the library, with the OS giving each its own virtual memory pages. The Spice module is linked to the static library, so accessing SPICE functionality through this module will enable all other modules to share the same library state (kernel files, etc).
Furnsh
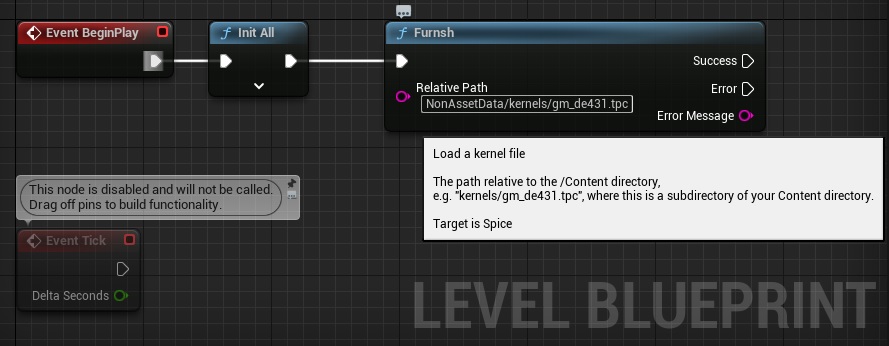
The next thing you need to know about is the SPICE Furnsh command. So, connect a Furnsh by right clicking and searching for furn.
This action calls a spice routine, furnsh_c, you can find documentation about it here:
Most of the SPICE UE5 library is a 1-1 mapping between Blueprints and SPICE. However, in this case it works slightly different than the SPICE version. That’s because Furnsh loads data files from disk, and SPICE doesn’t really know anything about how Unreal Engine bundles up content/files/etc while maintaining location “portability” between the editor and a packaged application. Anyways, our Furnsh will prepend whatever path is necessary to reach the project’s directory, so it takes a relative path to where you keep your spice data. The relative path will look something like NonAssetData/kernels/gm_de431.tpc.
Now we have a tiny two action Blueprint that will run every time we push the Play button in the menu. Try it now to make sure everything’s working okay so far. First, compile the blueprint by clicking the Compile button (and save the level, if you wish). Then, click the Play button and see what happens.

Connect a Furnsh action to your Level Blueprint and Play the level. Find the “Output Log” on the viewport editor tab and note any error messages.
Copy Challenge Solution to Clipboard
You won’t see very much. The feedback we’re looking for will be in the Output Log window. In red:
LogSpice: Warning: USpice Runtime Error: The attempt to load "C:/git/spaceflight/MaxQ/Content/NonAssetData/kernels/gm_de431.tpc" by the routine FURNSH failed. It could not be located.

This is because we haven’t yet put a kernel file into the project folder and entered a valid path into the Furnsh action.
Handling Errors
But, it’s kind of disturbing we didn’t seen any error messages in our level viewport indicating a problem, don’t ya think? Let’s fix that.
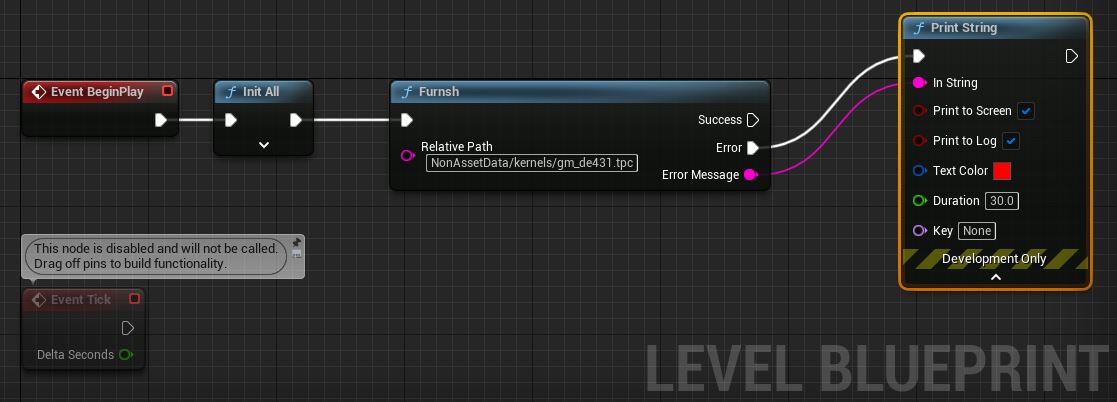
On the Furnsh Action, click down on Error Message, drag to the right, and let go of the mouse. Search for the Print String action and create an instance.
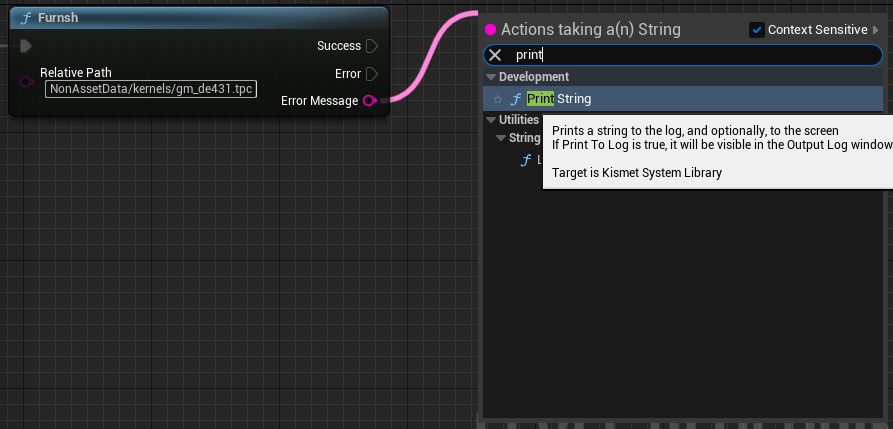
The UE editor found this node quickly because the context sensitive checkbox in the search window was selected. The output Error Message is a String type, and so is the Print String’s input (In String). Unreal Engine was able to quickly connect the dots. Context sensitivity helps to find nodes quickly, but very often you’ll find a search isn’t turning up the node you’re looking for and you’ll have to uncheck context sensitive to find it.
If you click on the arrow under Development Only on the Print String action you’ll find a few options. You can select the color red for Text Color since this is an error message, and perhaps 30 seconds for Duration.
Finally, connect the Furnsh action’s Error execution pin to the Print String’s execution input. If Furnsh succeeds, execution will follow the Success pin and our Print String action will not execute. If, however, Furnsh encounters an error, execution will continue from the Error pin and print our string.
Add an error handler to your Furnsh action. Try it out.
Do you see an error in the level Viewport?
Copy Challenge Solution to Clipboard
Now, if you go back to the level’s viewport and click Play you’ll see a red error message right there in the Viewport. If you don’t, you forgot to connect BeginPlay to Init All.
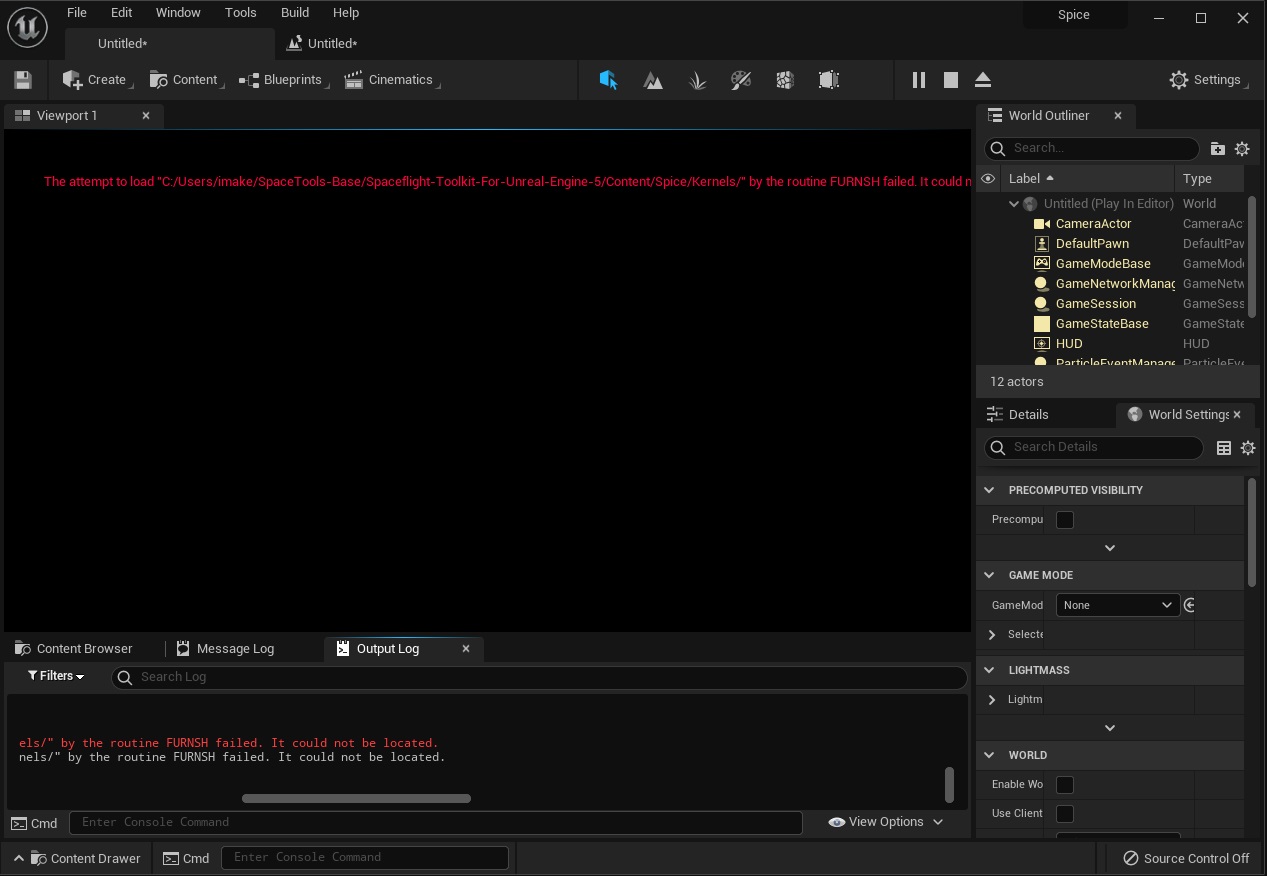
Kernel Data Files
SPICE can do a ton of geometric calculations, vector math, etc etc that are useful without any data files. But to do realllly interesting stuff with Spacecraft, Planets, etc, we’re going to need some data. Let’s make a directory to hold our data. In the Content Browser, right click and create a new folder - Spice. Repeat until you have a Spice\Kernels\Core hierarchy in the Content Browser. Use File Explorer to find this directory. It will be <project dir>\Content\Spice\Kernels\Core. This is where we’ll put the Kernel files we’re about to download.
Generic Kernels
Search Google for naif spice kernels.
Do you see a link to the Generic Kernels download site?
https://naif.jpl.nasa.gov/naif/data_generic.html
You’ll see a page describing the various kernel file types. Follow the Generic Kernels link to the actual generic kernel downloads. We see:
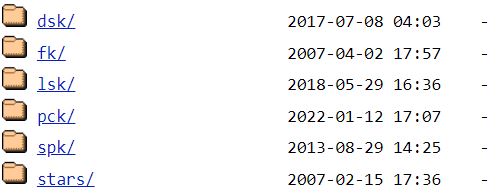
DSK
DSK kernels are “Digital Shapes”. We don’t need any DSK kernels quite yet, but we’ll be using some shortly to create a mesh for Phobos, one of Mars' natural satellites.
FK, CK, SCLK, IK
These kernel files usually apply to particular spacecraft missions. FK kernels describe relations between “frames”… Which are a little like Scene Graph nodes in UE or Unity. Not pictured: CK kernels contain orientation information, correlated to spacecraft clock times. SCLK kernels correlate spacecraft clocks to solar system time, and IK kernels describe spacecraft instrument details.
LSK
One of the most basic kernel files you’ll need is in the LSK kernel directory. Go there and download the file naif0012.tls, putting it in the Content/Spice/Kernels/Core directory.
This file is a LSK (“leap seconds”) Kernel. It’s a “text kernel file” meaning you can view its data in a text editor. The data is very basic; it’s just a list of all the leapseconds since January 1972. SPICE is very precise, being off by a second when something’s moving tens of kilometers per second means being off by, welp, tens of kilometers to be exact. Many calculations will err if there’s not a LSK kernel file (like this one) loaded. naif0012.tls is the most recent version, so it’ll do - until another leap second is declared.
PCK
Navigate to the PCK kernel directory web page.
PCK kernels pertain to the big bodies in our solar system. Earth. Moon. They contain physical and geometric constants, etc, that describe motions and orientations of these big bodies.
Download pck00010.tpc to our core kernels folder. This file has a lot of the constants we need, but it doesn’t have the planet/moon masses.
We can download gm_de431.tpc for the celestial mass values. The “431” and refers to DE431 which is a “Planetary and Lunar ephemerides”. This is a collection of calculations for the motions of the solar system. You can read more about DE102 through DE441 here if that’s interesting to you. This file is just the gravitational mass constants used to generate DE431, the actual calculations are in the SPK kernel folder. Download gm_de431.tpc so we have some celestial body masses.
Also, download geophysical.ker which has data to generate NORAD “TLE” orbital data. We can readily find TLE’s for almost anything orbiting earth, and we’ll do this shortly for the Hubble Space Telescope, so we’ll want this file.
SPK
SPK kernel files contain high precision state/position information for spacecraft, planets, etc. We don’t need any quite yet, though.
In your project Content directory, add a sub-folder to hold your Spice kernels - Spice/Kernels/Core.
Add these kernel files to your directory:
naif0012.tls
pck00010.tpc
gm_de431.tpc
geophysical.ker
Unreal Engine does not recognize the file types, so you won’t see any of the files in your Editor’s Content Browser.
Can you see these files with Windows Explorer?
With these kernel files we have enough data to start working with SPICE.
Basics - Actually loading our kernels
For things like resizing earth, moon, mars, etc meshes, etc, we can use SPICE to get planet diameters etc. Let’s see how!
First, let’s load our kernels. Going back to the level blueprint editor (Blueprints->Open Level Blueprint from a viewport window) it should be apparent how to fix our broken kernel load. Change the path to load the LSK file, naif0012.tls. Find the Furnsh action and click the Relative Path value, then edit it to Spice/Kernels/Core/naif0012.tls.
Try Playing the level again. You should not seen an error this time! Yay!
We can load all 4 of our files in whatever order we want by either serially connecting 4 Furnsh actions, one for each kernel, or by using a Sequence action.
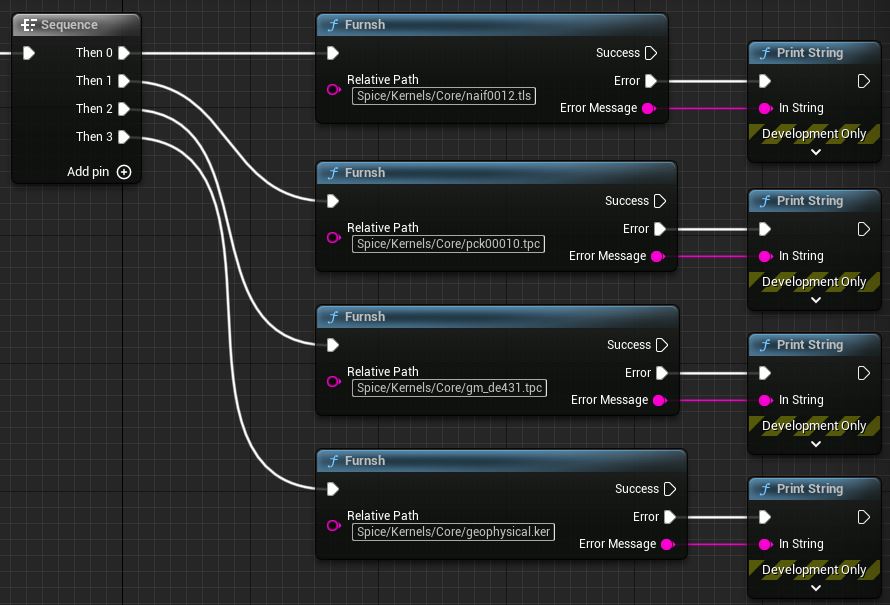
Arrange your Blueprint to load all 4 kernel files. Try adding a Print String that confirms the Blueprint executed.
Do you see any error messages?
Do you see any messages from your Print String confirmation?
Furnsh List
Another way we can load our kernel files is the Furnsh List action. This is similar to loading Spice kernels by creating a “meta-kernel” file as described in the SPICE documentation. A meta-kernel file is a list of kernels to load, which is what Furnsh List does, except with Unreal Engine String Arrays. Meta kernel files won’t work in our version of SPICE due to the file path issues. So, we use Unreal Engine String Array variables instead.
Replace the Furnsh action with Furnsh List. You’ll see this action has a Relative Paths input, which is an String Array. This is the list of kernel files that are to be loaded. Right click Relative Paths and select “Promote to Variable”. Unreal Engine now creates the proper variable to hold the array. Name it Required Kernels and hit Compile.
Now, on the My Blueprint tab there’s a Variables group with our Required Kernels variable. If we select that variable the Details panel to the right will allow us to edit the default value. We can click the + button 4 times and add the 4 paths of our kernels.
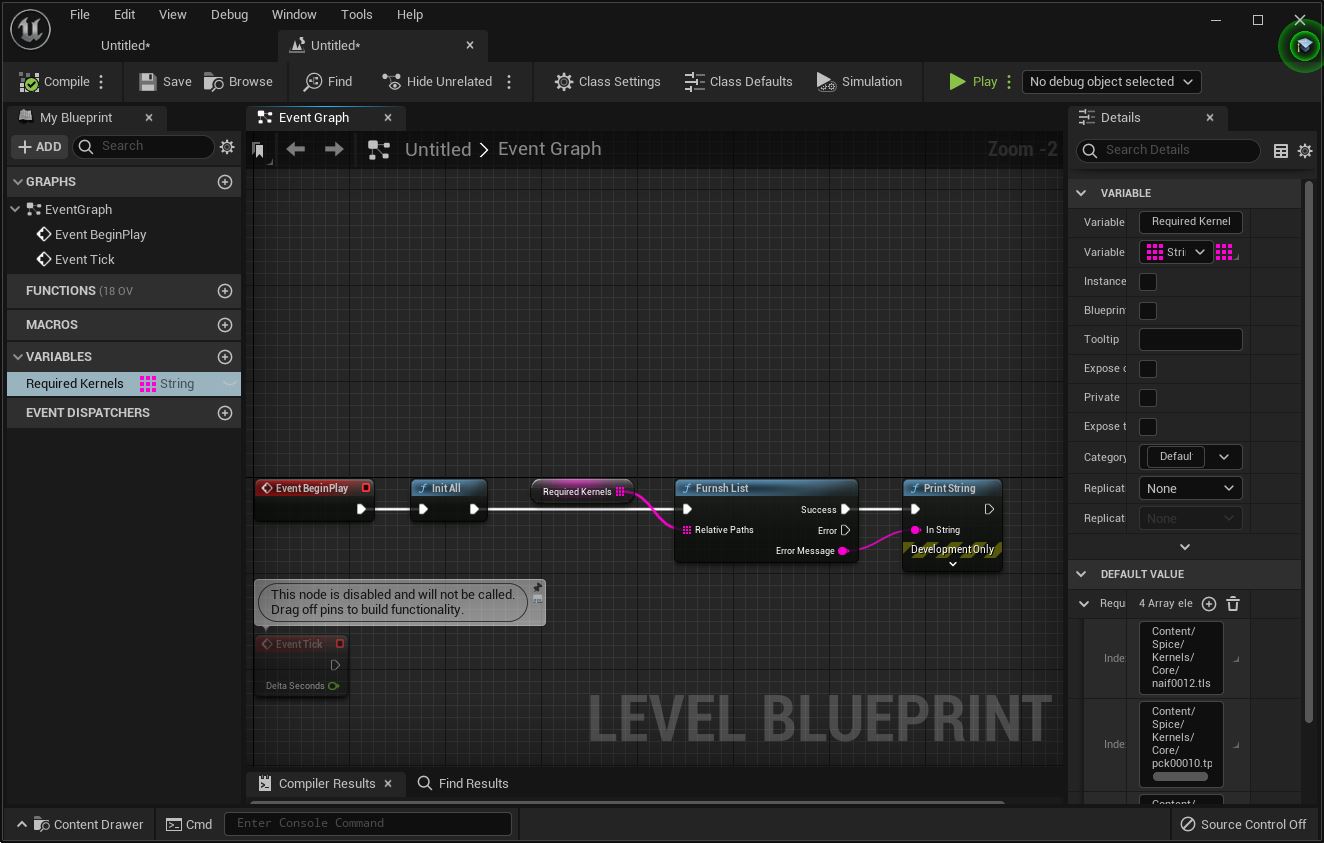
Copy 'Required Kernels' Variable to Clipboard
Copy 'Furnsh List' Blueprint to Clipboard
Enumerate Kernels
If we don’t care about the order the files load in, we can use an Enumerate Kernels Action to populate an array, and pass the results to Furnsh List. Enumerate Kernels enumerates every file (whether or not it’s a kernel!) in a directory and returns a String Array of relative paths. The order is not guaranteed, but that won’t matter if we’re just experimenting.

Certain high precision calculations often load kernels in a particular order to ensure correctness. In this case, though, we don’t care what order the kernels load in.
Reading a Radii Variable: Sizing Up Our Planets
Now that you have the kernels all loading without error let’s try getting some data out of them.
bodvrd
Let’s get Earth’s dimensions. After the kernels are loaded, add a bodvrd action. This action calls the SPICE bodvrd_c routine. Documentation on bodvrd_c is here. The Blueprint action returns the value as a Wildcard. We can connect this wildcard to a few of our datatypes - Double, Double(Array), SDimensionlessVector, SMassConstant, SDistance, SAngle, and SDistanceVector. However, the burden is on us to ensure that the type and input units are appropriate for the data we load. Namely, that they match the data as authored in the kernel. For instance, angles as Degrees, distance as Kilometers. Etc. If the units don’t match the automatic conversion in the Toolkit we’ll need to load raw data and do a conversion in the blueprint (convrt is often useful for that.)
What are all these data types for? Let’s discuss :).
Double
A dimensionless (unitless) scalar as a double precision floating point value. An Orbit’s eccentricity value, etc.Double(Array)
An array of doubles. This can return aDoubletype of arbitrary dimensions.SDimensionlessVector
This is a 3-dimensional Double type - with x, y, and z components. A ‘unit normal’ vector, etc.SMassConstant
Holds Standard Gravitational Parameter values. E.g., a body’s mass multiplied by the gravitational constant - “GM”. Did you know for some bodies we know the value of “GM” more precisely than we know either “G” or “M”?. It’s just astronomically more handy carrying the product of them around as GM, so that’s what we do. This datatype holds GM values.SDistance
Holds distance values. These are serialized in Kilometers, and default conversions to/from double types assume the same.SAngle
Holds angular values. Default conversions to/fromDoubletypes in the code assume radians. However,SAngles are serialized as degrees. If you’re editing angles in the Unreal Editor - you almost always want to see ‘Degrees’.FSAngle’s constructor as well as it’s C++AsDouble()method both assume radians, as that’s almost always what SPICE wants. The Blueprint actions for converting to/from BlueprintDoubletypes also assume radians. To be unambiguous, you should use Blueprint actionsDegrees2Angle,Angle2Degrees,Radians2Angle, andAngle2Radiansto exchange SAngle types and degrees/radians. For formatting angles as strings, seeFormatAngle- it has 4 options, including radians, degrees, and two other formats.SDistanceVector
ASDistance, but 3-Dimensional.
There are many other data types, these are simply the types we can link the return value of bodvrd to.
Unreal’s C++ UFUNCTION does not support wildcard return types. Adding wildcard support required tapping into Unreal Engine K2Nodes. This is a long topic for another day. But if you’re interested in K2Nodes, the code provides several examples. See the MaxQ/Source/SpiceUncooked for example code. More info on rolling with KNodes can be found here and here.
Back to bodvrd. Leave the default Bodynm as EARTH and Item as RADII. If the function has an error, use a Print String action to print the error. If it succeeds, use a different Print String action to print the Return Value. Do this by “dragging” on the Return Value and searching for To String. This should pull up Conv SDistance Vector To String so select that. You’ll get a little node with a $ on it, which is a Distance Vector to String conversion. Connect that string value to a Print String Node.
This is a little tricky since Return Value is a Wildcard, and we’re trying to print it. Print String doesn’t know if it should be printing a SDistanceVector, a SMassConstant, or what… And thus it cannot tell the Wildcard what value it expects. To break the cath-22 we anchor the Conv SDistance Vector To String action, and both sides can then agree what to do.
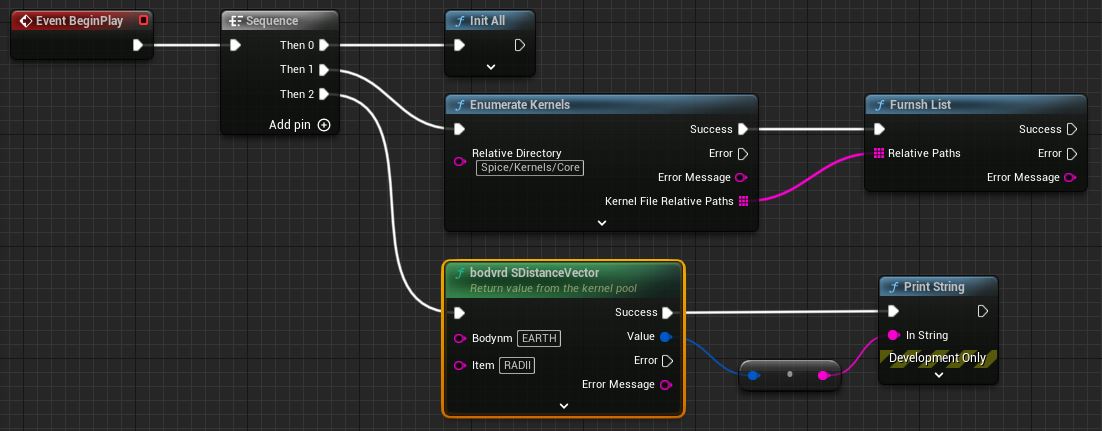
Design a Blueprint to read and print the RADII variable for body EARTH.
Does your answer agree with wikipedia’s answer?
Copy bodvrd Blueprint to Clipboard
If you compile this Blueprint, then Play the level you’ll see a screen message with the earth’s dimensions, as well as a line in the Output Log window:
LogBlueprintUserMessages: [TestMap_C_9] (6378.136600, 6378.136600, 6356.751900)
Yes, this is indeed matches the radius of Earth, in kilometers. Notice how the z value is less than x and y? The z axis is aligned with the north pole, while x and y are in Earth’s equatorial plane. The Earth is an Ellipsoid, meaning the radius at the equator is greater than the radius at the north pole. It’s a little bit “squished”, like if you stepped on a basketball a little bit.
We can repeat this for Mars, for Moon, for Sun… For whatever celestial bodies we have kernel data for. Hmmm… What bodies DO we have kernel data for?
Enumerating Kernel Pool Variables
Games are often data-driven, where the game “discovers” the data it has. For instance, we can create a “Mars” object, a “Jupiter” object, etc,. Or, the game can enumerate the things it has data on, then autonomously create the objects.
So, now we want to know what all planets, moons, etc we can get RADII data on using the kernels we have. How would we enumerate these, so we can add them to a map screen, or something, automatically?
gnpool
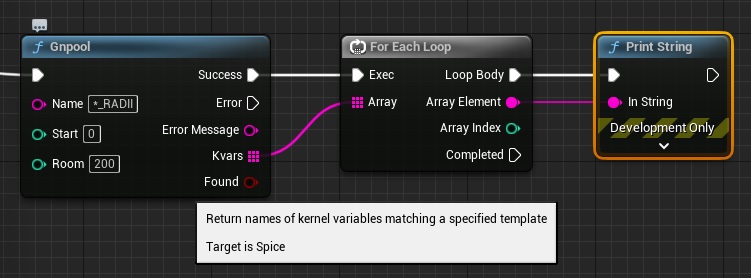
It’s as simple as a Gnpool action.
Design a Blueprint that gets a list of all “*_RADII” kernel pool variables.
Use a For-Each loop to print each one.
The names don’t look familiar, so how would you figure out what these names mean? Which variable is the Moon’s RADII?
Copy gnpool Radii Blueprint to Clipboard
This spits out a list:
BODY704_RADII
BODY614_RADII
... (75 items total)
BODY2000253_RADII
Well, that’s less than human readable. No problem! All we have to to is use action Bods2c to transform these strings into integer ID codes, then Bodc2n to get a human readable name. (We’ll also need to trim the BODY and _RADII from the strings so it’s just the stringified number like "399", but that’s no problem).
Copy gnpool Radii/bods2c/bodc2n to Clipboard
And viola, we’ve enumerated the names of everything that has a RADII datapoint in the kernels.
OBERON
CALYPSO
MARS
... (75 items total)
PUCK
“BODY299” is a “NAIF Name”. See:
https://naif.jpl.nasa.gov/pub/naif/toolkit_docs/C/req/naif_ids.html
Gravitational Constants
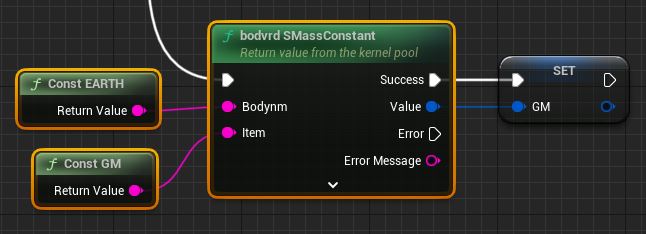
We’ll often need the mass of various celestial bodies, by way of their standard gravitational parameter, abbreviated GM. In this case, we’ll use the bodvrd action to fetch it as a single Mass Constant value. MaxQ contains a number of “Literal Constant” values for Naif Names, Reference Frame Names, Property Names, etc. Try searching Blueprint Actions for “MaxQ Const” to see what’s available.
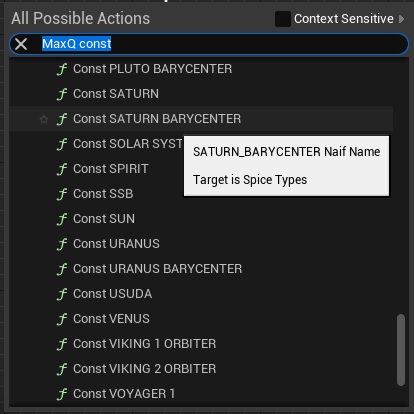
Using these constants is preferable, as it may safe you from a bug due to a misspelling. In this case we’re using the constant values for EARTH and GM.
Create a Blueprint that prints the Gravitational Constants of SUN and/or EARTH.
Do your answers agree with reference material you find online?
We get a mass constant of the earth:
LogBlueprintUserMessages: [TestMap_C_2] 398600.435436
Repeating the above Gnpool action to enumerate all _GM datapoints, it turns out we know the mass of 68 bodies:
MARS BARYCENTER
CHARON
URMOM
... (75 items total)
NEPTUNE
Copy gnpool GM/bods2c/bodc2n to Clipboard
The gravitational constant of MARS BARYCENTER would be the total of Mars and its two natural satellites.
Bringing things to life: Computing Celestial Positions
We’ll need to know where to position everything if we want to bring our world to life, right?
Positioning by SPK/Ephemeris Data
Getting the current position of, say, MOON with respect to the EARTH/MOON BARYCENTER is simple.
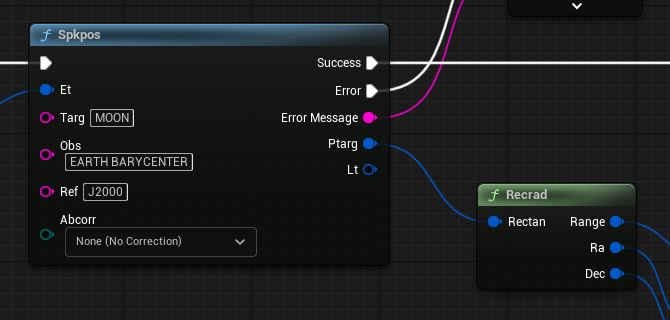
spkpos
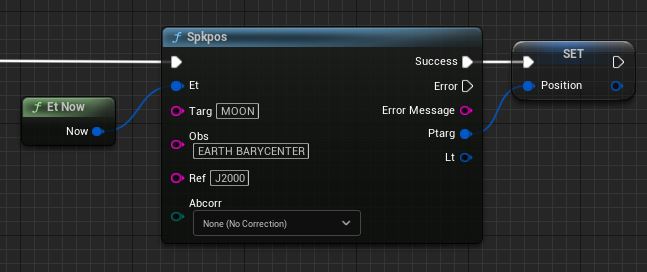
Spkpos. It really is this easy, just one Action. We can convert this value to an Unreal Engine vector and move the Moon around our scene.
Inputs
et: is the current time, an Ephemeris Time.
Targ: means we want the position of target MOON.
Obs: means we want the position relative to observer EARTH BARYCENTER.
Ref: IAU_EARTH means we want the coordinates with respect to earth’s “fixed” reference frame, the frame that rotates with the Earth.
Abcorr: value None means we do not want to correct for the time it takes light to travel from target to observer, no Aberration Correction. If we wanted, we could correct for that and compute where moon ‘appears’ to be, instead of actually is.
Outputs
Ptarg is the position of Moon, of type SDistance Vector.
Lt: would give us the light travel time, the length of time it takes for light to get from Moon to Earth.
SEphemerisTime
This data type holds time values. They can be parsed from strings using toolkit Actions (str2et,utc2et), or the current time can be read now via anEt nowaction.
At least, that’s how it works in theory. When we run this, we immediately get an error:
USpice Runtime Error: Insufficient ephemeris data has been loaded to compute the position of 301 (MOON) relative to 3 (EARTH BARYCENTER) at the ephemeris epoch 2022 JAN 04 11:39:10.782
So, what’s wrong with our Blueprints? Well, nothing! We just need some SPK data that models the movement of Earth, Moon, other planets, etc etc.
If we go back to the NAIF website, download de430.bsp (link) and put it in our core kernels directory… Spkpos works! If we normalize Ptarg to get a distance in Kilometers (vnorm or vdist), we get:
373618.4
We don’t have to understand how Spkpos works, do we? It’s simple to use, once we understand Target (Targ), Observer (Obs) and Reference Frame (Ref).
Coordinates
An appendix, placed in the middle of the main article.
| What | It is |
|---|---|
| Target | What do we want the position of? |
| Observer | What is the position relative too? |
| Reference Frame | What is the orientation of the coordinate system? |
The most confusing part would be reference frames. It’s simple, and there’s only a few we use often.
| Reference Frame | It is |
|---|---|
| J2000 | Aligns XY in Earth’s Equatorial plane, Z: North Pole, X towards Sun from Earth at Vernal Equinox. Does not rotate with Earth. |
| ECLIPJ2000 | As above, but aligned to the Ecliptic plane. |
| IAU_EARTH | J2000, but rotates as if attached to earth |
| IAU_MOON, etc | See above, but to whatever body they’re attached to |
There are also a few special Observers/Targets
| Observer/Target NAIF Name | It is |
|---|---|
| MOON, MARS, etc | Celestial bodies |
| [body] BARYCENTER | The point in space multiple bodies mutually orbit |
| SOLAR SYSTEM BARYCENTER | Solar System “Barycenter”. The point in space the Sun and Planets etc mutually orbit. This is “home” to everything else. |
| SSB | Short form for above |
| EARTH BARYCENTER | The point in space EARTH and MOON mutually orbit. |
| EMB | Short form for above |
If you understand those, you can get a the position of any SPK object in Rectangular Coordinates from Spkpos etc.
But, at human scale we don’t relate well to Rectangular coordinates, so we’ve made not 1, not 2, but 3 coordinate systems with longitudes & latitudes. 3? 3! 3.
And we need a coordinate system like those, but doesn’t rotate… for stuff that floats around in Space.
And there’s other kinds of math, like spherical and cylindrical, so just to make this appear to be as complicated as possible we can make some coordinate systems for those, too.
| Coordinate System | Variable Type | Coords | Conversions |
|---|---|---|---|
| Rectangular | SDistanceVector |
X Y Z | (many) |
| Planetographic | SPlanetographicVector |
LON LAT ALT | recpgr, pgrrec |
| Geodetic | SGeodeticVector |
LON LAT ALT | recgeo, georec |
| Latitudinal | SLatitudinalVector |
R LON LAT | sphlat, cyllat, latcyl, latrec, reclat, latsph |
| Range, Right Ascension, Declination |
SDistance / SAngle / SAngle |
RANGE RA DEC | recrad, radrec |
| Spherical | SSphericalVector |
R COLAT LON | cylsph, latsph, recsph, sphcyl, sphlat, sphrec |
| Cylindrical | SCylindricalVector |
R LON Z | sphcyl, cyllat, cylrec, cylsph, latcyl, reccyl |
| State | SDimensionless* |
xfmsta |
|
| Cylindrical | SCylindricalVector |
R LON Z | sphcyl, cyllat, cylrec, cylsph, latcyl, reccyl |
| State | SDimensionless* |
xfmsta |
|
| Range, Azimuth, Elevation |
SDistance / SAngle / SAngle |
RANGE AZ EL | recazl, azlrec |
Know what tho…? All we care about is these:
| Domain | Coordinates | Reference Frame Type | Examples |
|---|---|---|---|
| Ground / Surface | Longitude & Latitude | Fixed (rotates with body) | IAU_EARTH, IAU_MOON, IAU_MARS, etc |
| Space | Right Ascension & Declination | Inertial (Non-rotating) | J2000, ECLIPJ2000 |
| Math | Rectangular | Intertial (Non-rotating) | J2000, ECLIPJ2000 |
Now you have enough knowledge to use spkpos AND convert the results to something relatable… We don’t need to know how it works, only that it does work, right?
GREAT. So, Chuck, now you’re telling me you want the Moon’s position in Right Ascension / Declination?
Yeah, that’s exactly what I’m saying.
recrad
We can use recrad to convert our rectangular coordinates into Range/Right-Ascension/Declination values.
We get values :
Range  369101.25
Right Ascension  22h 28m 36.179s
Declination -16 54'53.820
This reference says, however, for today the values are:
Range  373,859 km
Right Ascension  22h 35m 3s
Declination   -14° 39' 21"
Hmmmm… Hmmmmph. Close, in a general way. But in a much more specific way they’re not close at all. We’re most likely using different ephemeris data (SPK kernels), but our answer is off a bit more than expected. Why? Well, if you remember - we calculated the moon’s position relative to the Earth-Moon Barycenter, the point that they mutually orbit. Let’s try again, but get moon’s position relative to (Observer) EARTH.
Copy Moon Blueprint to Clipboard
Now we get :
Range  374112.02
Right Ascension 22h 32m 41.261s
Declination -14 41'11.897"
Closer! Much closer! The differences are probably due to different ephemeris data and differences in Epoch/Ephemeris Time used as input. This is the first way of moving things around - ephemeris data.
Ephemeris data can be generated on Demand for “small bodies” (asteroids, comets and such).
See the Solar System Dynamics/JPL/NASA Horizons web app:
https://ssd.jpl.nasa.gov/horizons/app.html
For example, you could get ephemeris data for 99942 Apophis for its April 2029 near miss with Earth:
https://en.wikipedia.org/wiki/99942_Apophis#2029_close_approach
Build a Blueprint that computes the current Longitude and Latitude of SUN & MOON in the IAU_EARTH reference frame.
Use google maps to find the longitude and latitude locations on a map. So, where are they, relative to your current location?
Go outside or look out your window and observer them. Are they in the correct place?
Design a Blueprint that computes the current Right Ascension of SUN & VENUS in the J2000 reference frame.
Based on the result, should VENUS be appearing before SUN at sunrise, or following the SUN at sunset?
Now, go outside and observe a sunrise and a sunset, look for Venus.
Is Venus in the right place?
Positioning by TLE: Hubble Space Telescope
What if you don’t have Ephemeris data, but you have something currently in orbit, for example the Hubble Space Telescope? Well, if it’s in Near-Earth Orbit (and sometimes farther) Two Line Elements(TLEs) are commonly used to “propagate” the orbit. E.g., to predict future locations. TLEs look like:
HST
1 20580U 90037B   22010.54856767  .00000893  00000-0  42745-4 0  9993
2 20580  28.4696 134.5382 0002786 129.9204 289.6315 15.09931360542325
That’s Hubble Space Telescope. TLE’s are good for propagating orbits with decent precision for a few days or so. There are a number of places to get up to date data on almost anything orbiting Earth.
A searchable SATellite CATalog:
https://celestrak.com/satcat/search.php
Find the Hubble Space Telescope’s Two-Line Elements. It’s cataloged as “HST”.
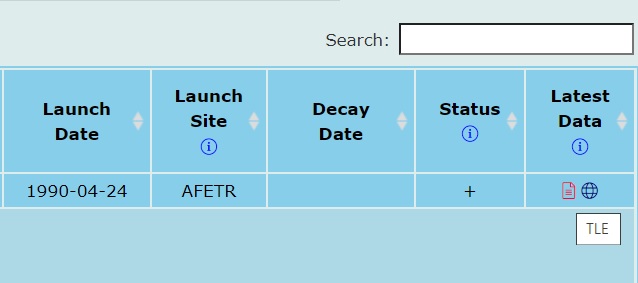
If you search for a satellite and find a record for it you can find a TLE towards the right, under “Latest Data”.
Getelem and Evsgp4
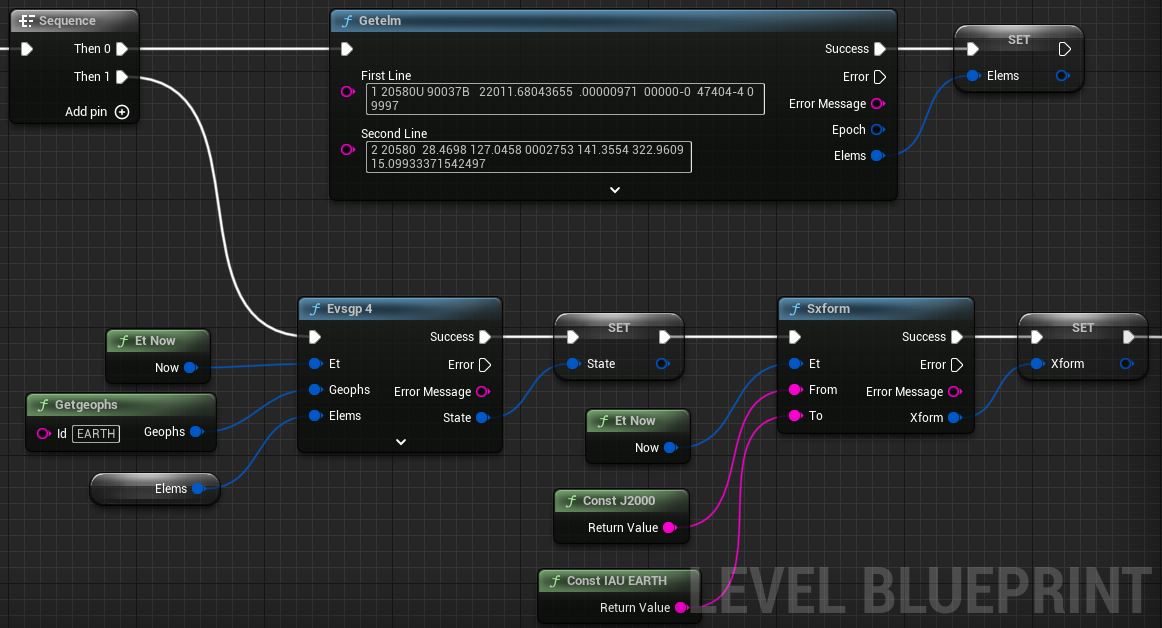
In the toolkit we can use getelem to parse the TLE data and evsgp4 to get a state vector. The later will also need those geophysical constants from the geophysical.ker kernel file we snagged earlier. As long as the kernel file is loaded we can load the constants into evsgp4 via the Getgeophs Action. This all is good enough to get us the position and velocity in the J2000, the non-rotating frame. If we want a longitude and latitude we’ll need to transform the state vector into the Earth’s fixed frame, IAU_EARTH. We do that by getting a state transformation matrix via sxform and apply it to the state vector by multiplying it, via mxv. That gives us rectangular state vector, if we want it as a longitude/longitude/altitude we can transform it by recgeo (geodetic coordinates) or reclat or recpgr (geographic coordinates). You can read more about geodetic coordinates etc etc in Appendix C of this pdf.
So, got that? I’ts getelem to evsgp4 assisted by Getgeophs to sxform to mxv to recgeo. They say a picture’s worth 1000 words, well here it’s probably worth at least 16.
Copy Hubble Blueprint to Clipboard
et now
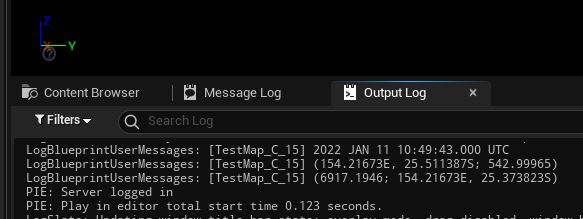
If we want the current position we can just set the time to Et now. We do all this, and out comes Hubble’s position including Longitude and Latitude.
Or, more legibly:
2022 JAN 11 10:49:43.000 UTC
(154.21673E, 25.511387S; 542.99965)
We can googlemapsit and see where that is, exactly…
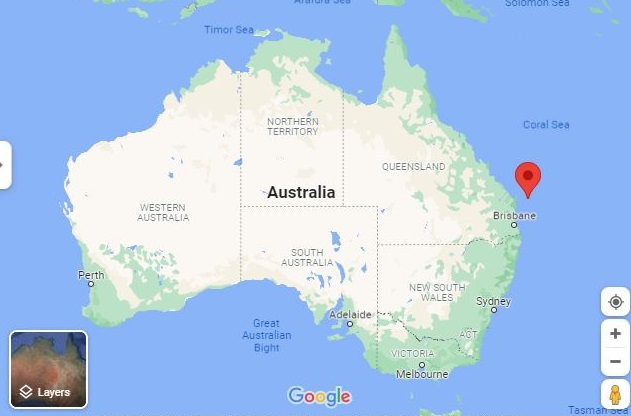
So, Hubble is just off the Australian coast at the moment. Let’s cross check that against CelesTrak.
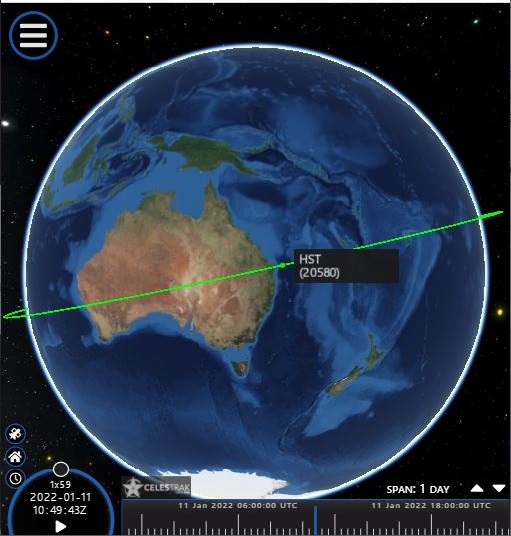
Ding ding ding winner winner chicken dinner!
The cool part is we did the computational gymnastics without writing a single line of code. Well. NAIF wrote a bunch of code. So did Epic. And we wrote a little bit to bind them together. But we don’t need to write any more. We may be pretending to be rocket scientists but we don’t have to pretend to be programmers anymore. Excuse me, aerospace and software engineers.
Cool party trick, tho, right? Now you have no excuse for not knowing where Hubble is :/
And that, is the second way we can position something. But that really only works for Low-Earth-Orbits. What about orbits in strange places, like around Saturn?.
Where is ISS, the International Space Station right now?
Find an online reference, does it agree with you?
Positioning by Orbital Elements: Comet Hyakutake
The third way we can get an orbital State Vector (fancy word for position and velocity) is a simple approximation based on orbital elements. If we want to get a real world position for something orbiting Saturn, or perhaps, Moon Mars or Jupiter, we can use orbital elements. We’ll also need to know the reference frame we’ll have and what frame we’ll want them in.
This is an easy way to drive a ‘plausible’ orbit for, like, visualizing something that doesn’t actually exist. Like, a mission far in the future. Or, for a game. Etc. And, for the vast majority of things like the 1 million plus asteroids floating around the solar system it’s easy enough to find orbital elements. For instance, the Solar System Dynamics Small Bodies Database has over 1 million orbital elements for asteroids and comets here and here.
Solar System Dynamics maintains a database of over 1 million small bodies (asteroids, comets, etc) including orbital elements. This data can be downloaded in .csv format, and then easily read into Unreal Engine.
Try impressing friends and neighbors in your next conversation by casually dropping in a few orbital elements from an obscure comet:
https://ssd.jpl.nasa.gov/tools/sbdb_query.html
https://ssd.jpl.nasa.gov/tools/sbdb_lookup.html
“Well, my boss is as eccentric as comet Hyadutake, around 0.99989. Yeah, and with a semi-major axis of 2125 astronomical units and I don’t think we’ll be seeing that one again for 70,000 years. Unfortunately, my boss’s semi-major axis is 10 feet - from me. I gotta lose some mass constant. Hey, where ya going? Wow, no inclination and very eccentric.”
Keep in mind you can generate ephemeris data for Small Bodies like Comet Hyakutake. Ephemeris data is always preferable when you have it.
conics
Obtaining a state vector from orbital elements is easy. conics takes the orbital elements as an SConicElements (note to self: rename that structure), and an SEphemeris Time and it outputs an orbital state vector.
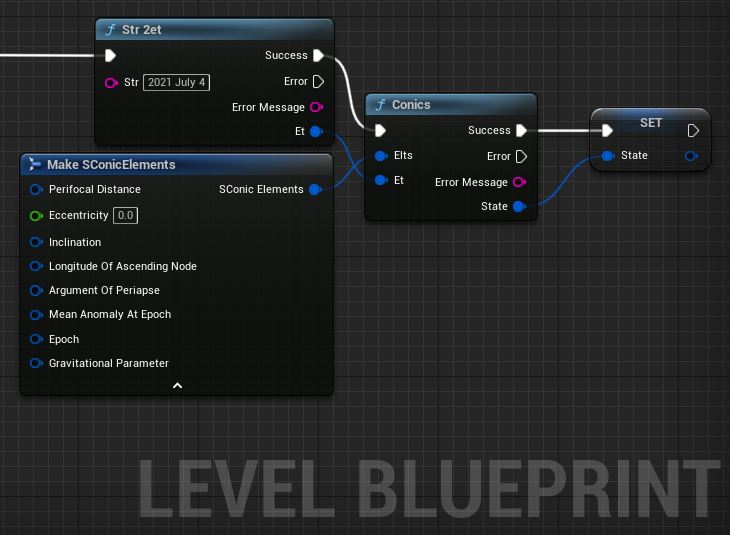
Copy Hyakutake Conics to Clipboard
If you copy the Blueprint above and connect it to the BeginPlay event, you’ll get an estimate of comet Hyakutake’s current position.
It gives:
Hyakutake Range: 48.614493 au; 15h 20m 42.347s, -43 51'19.831"
Let’s cross check against theskylive.com.
48.949486 au, 13h 55m 33s, -58° 59’ 18”
Sorta ballparkish? The actual values are probably based on updated observations. The orbital parameters in our calculation were from an 1996-Mar-15.0 observation. That’s the last time it visited. Considering input data and how simplified this sort of orbit propagation is, our approximation probably isn’t toooo bad.
Supposedly it has an orbital period in the ballpark of 70,000 years. A little bit of binary searching gives the next visit in the year 100,421 based on the above. Hmm.
Jan 1, 51421 Hyakutake Range: 4263.128404 au; 14h 48m 43.261s, -38 47'22.992"
Jan 1, 100421 Hyakutake Range: 4.51799 au; 13h 28m 43.320s, -19 16'44.682"
If anyone’s left in ~100,421 A.D. when it comes back, they’ll probably be all like “wow, can you imagine how primitive the last human beings that saw this were? They probably ate food that grew from the ground and drank water that’s been sitting around for years, just piped it out of lakes and stuff. Eiw. Please pass the LOX and H2, I’m thirsty for water now.”
This challenge is complex, but it’s a lot of fun and very satisfying to complete.
Query the Solar System Dynamics Small Bodies Database for every Near-Earth Potentially Hazardous Asteroid.
(Challenge continues below)
In the SSD Small Objects Database:
https://ssd.jpl.nasa.gov/tools/sbdb_query.html
Selecting these fields will allow you to export orbital parameters in bulk to a CSV File:
| web app field | SPK-ID | object-fullname | NEO | PHA | epoch | e | q | i | node | peri | M |
|---|---|---|---|---|---|---|---|---|---|---|---|
| csv field | spkid | full_name | neo | pha | epoch | e | q | i | om | w | ma |
CSV Results will look like:
| spkid | full_name | neo | pha | epoch | e | q | i | om | w | ma |
|---|---|---|---|---|---|---|---|---|---|---|
| 1000036 | 1P/Halley | Y | 2449400.5 | 0.9671 | 0.586 | 162.26 | 58.42 | 111.33 | 38.38 | |
| 1000025 | 2P/Encke | Y | 2457296.5 | 0.8483 | 0.336 | 11.78 | 334.57 | 186.55 | 202.74 | |
| 1000504 | 3D/Biela | Y | 2390520.5 | 0.7513 | 0.879 | 13.22 | 250.67 | 221.66 | 0.95 |
(continued)
Design a Blueprint that loops through the file and reads the data an Array variable of SConicElement values.
If you’re comfortable with Unreal Engine, use an InstancedStaticMesh or even DebugSphere to plot the position of all of them in the viewport.
Otherwise, loop through the list and compute the distance each one presently is from earth and find the nearest one.
Some Blueprint reference material:
-
A definition of the Datatable Record Structure, SmallBodyRecord_STRUCT.COPY, is in the main branch of the sample project. You can recreate that, migrate it, or come up with your own.
-
Full solution, including sort-by-distance, as implemented in sample project (Actor ‘ReadSmallBodies_BP’,
BeginPlay). -
A few records from the DB in CSV format. Paste to notepad, save as .csv:
Positioning by State Vector
oscelt
When you have a state vector it can be handy to compute the Orbital parameters from it. You can then render an orbit from the parameters.
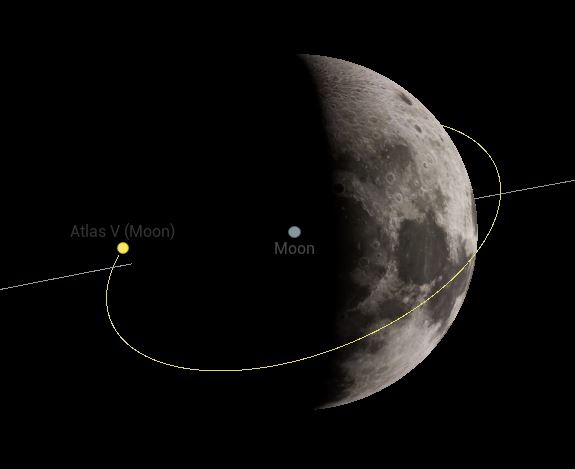
For instance, displaying an orbit to a player as they maneuver a spacecraft via Rigidbody Physics. Or, if you have an orbit based on TLE or ephemeris data you can use its state vector and oscelt to compute and render an ellipse. The orbit will change over time, of course, but that’s okay. In the close encounters video with 99942 Apophis at the 1:31 timeline marker, for instance, you see the asteroid’s orbit change before/after the encounter. Earth gives the asteroid a gravity assist, lends it some momentum.
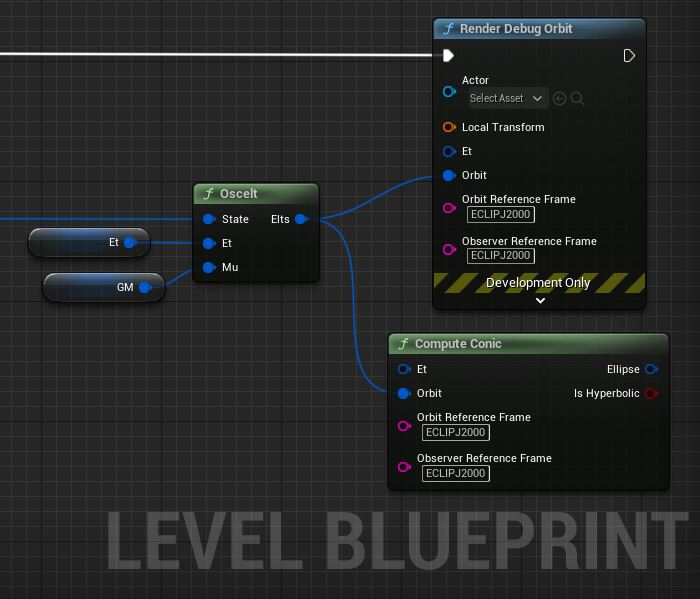
Copy TLE to Orbit to Clipboard
Copy SPK to Orbit to Clipboard
Neither of those snippets are complete, we’ll need an Actor before the orbit rendering will work.
A rogue comet from outside the solar system is about to collide with the moon. Cool, right?
What would MOON’s orbit look like if the collision adds 1 km/s to its velicity (prograde)? Will we still have a moon or would it escape? Or, would it crash into Earth?
What if the collision reduced moon’s velocity by the same? Would we be doomed?
Sounds like a Netflix movie waiting to happen.
View Solution on blueprintue.com
Getting Celestial Shapes: Meshes from DSK Kernels
What about DSK Kernels, can we actually get a mesh out of them?
Yup.
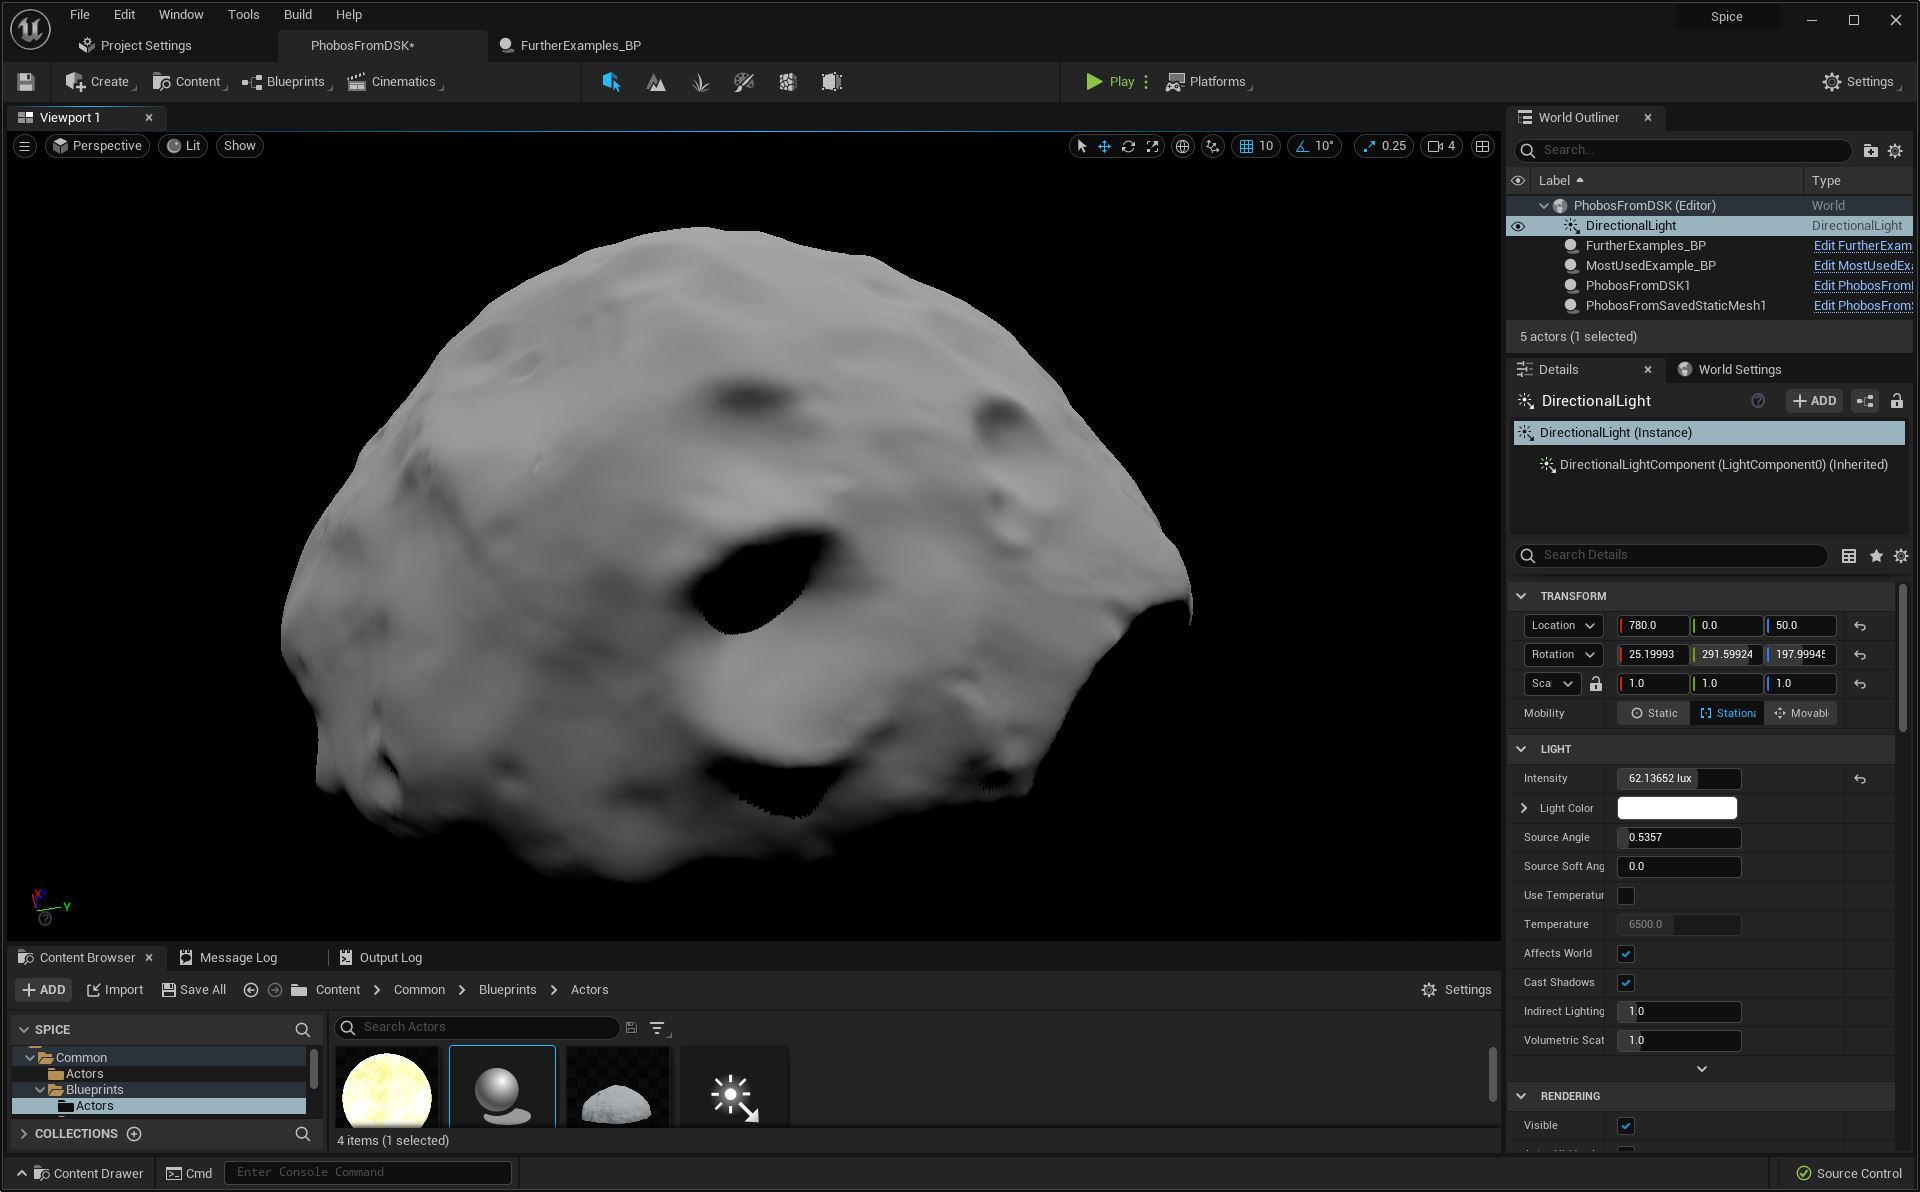
We can read the DSK and tesselate data into a procedural mesh at runtime. The procedural mesh will also let us save a copy of it as a static mesh. E.g. no more need to do this at runtime.
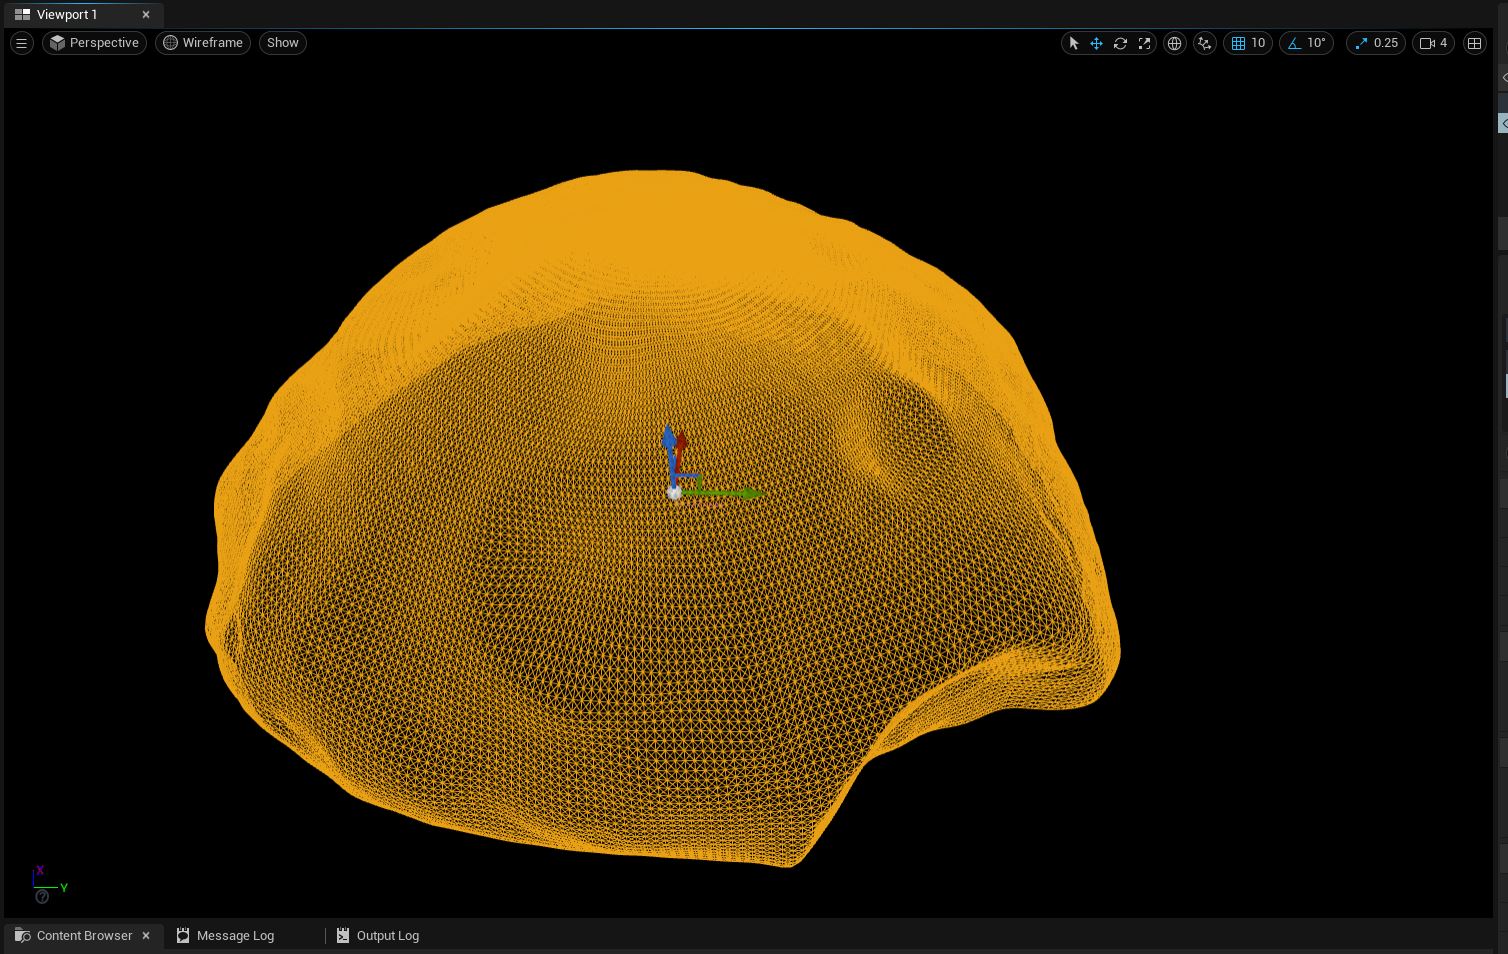
There’s a good way to do this, and a non-good way.
Low-Level DSK Api (dskv02, dskn02_c, and the gang)
The non-good way is to open the DSK with the low level APIs, iterate over every vertex in the DSK, and feed that directly into a mesh.
The operations go a little something like this:
dasopr: Open the DSK kernel.
dlabfs: Search for the first segment record.
dskz02: Determine how many vertices and indices we have.
dskv02: Get the vertex data.
dskp02: Get the indices/triangle data.
dskn02: For each vertex, calculate a surface normal vector.
dascls: Close the DSK kernel.
Copy Phobos Low-Level DSK Blueprint to Clipboard
I don’t recommend actually trying the above. It’s 3 million vertices and 4.5 million indices. 1.5 million triangles. It also triggers Unreal Engine’s maximum iteration safeguard, to actually run this blueprint you’d need to increase the maximum allowable iterations in the project’s settings.
High-Level DSK Api (latsrf and srfnrm)
So then, can we actually make use of DSK kernels? If so, how?
Yes, we can. We use the higher-level APIs, which give us control over how finely we tesselate the mesh.
latsrf: Input a grid of longtitudes/latitude, get surface points as output.
srfnrm: Compute normals for the surface points.
Copy DSK To Mesh Core to Clipboard
To actually make use of all the surface points/normals we need to compute vertex, normal, and index arrays. We can feed those into a procedural mesh. It’s a little involved but very tractable in Blueprints alone.
Copy DSK To Mesh Full to Clipboard
This challenge is complex, but it’s a lot of fun and very satisfying to complete.
Find a small DSK Kernel of an asteroid on the NAIF website.
Read it into a procedural mesh.
Save it as a static mesh.
Cool fact: Spice Has a “Geometry Finder” subsystem that can solve a crazy number of geometric questions. The docs have a number of “recipes” that can be quickly Blueprinted.
Periapse/Apoapse
To find the unique closest approach of an observer to a target over a specified time window, call
gfdist, specifying the
ABSMIN
(absolute minimum) relational operator. To find all of the ‘close approaches’ of an observer to a target over a specified time window use the
LOCMIN
(local minimum) relational operator.
For apoapse events, use the absolute or local maximum operators instead:
ABSMAX
LOCMAX
Spacecraft eclipse
Defining a spacecraft eclipse as the presence of the spacecraft in the shadow created by the Sun and a blocking body, one can observe that eclipses are equivalent to occultations, where the spacecraft is the observer, the Sun is the ‘back’ body, and the blocking body is the ‘front’ body.Use
gfocltto search for spacecraft eclipses.
That one means, if you want to know when a Spacecraft’s solar panels can’t get any sunlight because it’s in the planet’s shadow, use this.
The Geometry finders can do some powerful finding, geometrically speaking. Let’s try one!
Finding lunar/solar eclipses
Right about now you’re probably wondering when the next solar eclipse is happening.
If you can’t be bothered to google it, OR you’d much prefer a more exciting method, SPICE has your back.
gfoclt
We can use gfoclt to find eclipses.
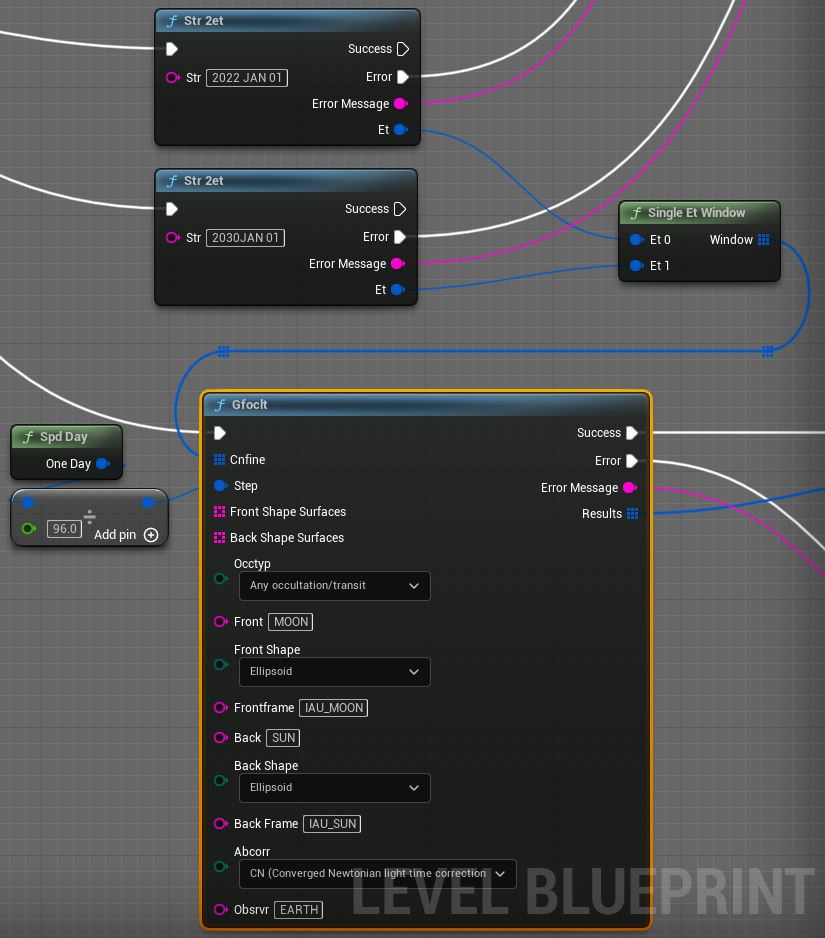
Copy Solar Eclipses to Clipboard
For a Solar Eclipse we’re just looking for times where the Moon occults the Sun as viewed from Earth. E.g., when are we in the Moon’s shadow?
So… The Sun is in the Back.
The Moon is in Front of it.
And Earth is the Observer.
Plug those into gfoclt and let’s roll!
Solar Eclipse Found : start 2023 APR 20 03 : 35 : 43.159 UTC, stop 2023 APR 20 04 : 57 : 51.936 UTC
Solar Eclipse Found : start 2023 OCT 14 17 : 10 : 44.218 UTC, stop 2023 OCT 14 18 : 48 : 17.106 UTC
Solar Eclipse Found : start 2024 APR 08 17 : 34 : 42.342 UTC, stop 2024 APR 08 18 : 59 : 58.773 UTC
Solar Eclipse Found : start 2024 OCT 02 17 : 51 : 35.034 UTC, stop 2024 OCT 02 19 : 38 : 33.159 UTC
Solar Eclipse Found : start 2027 FEB 06 15 : 01 : 52.293 UTC, stop 2027 FEB 06 16 : 57 : 23.610 UTC
Solar Eclipse Found : start 2027 AUG 02 09 : 14 : 11.218 UTC, stop 2027 AUG 02 10 : 59 : 10.854 UTC
Solar Eclipse Found : start 2028 JAN 26 14 : 17 : 49.387 UTC, stop 2028 JAN 26 15 : 57 : 50.440 UTC
Cross-checks okayish, the results don’t perfectly match a reference source. It looks like our search didn’t count a couple of Eclipses that the internets count. Hmm.
To search for a Lunar Eclipse we just swap out the Earth and Moon. Now we finally know when Moon will be in Earth’s shadow.
So, Sun is in Back again.
Earth is in Front of it.
And this time Moon is the Observer. Right?
Lunar Eclipse Found : start 2022 MAY 16 02 : 58 : 45.274 UTC, stop 2022 MAY 16 05 : 24 : 10.147 UTC
Lunar Eclipse Found : start 2025 MAR 14 05 : 46 : 31.447 UTC, stop 2025 MAR 14 08 : 11 : 17.507 UTC
Lunar Eclipse Found : start 2025 SEP 07 16 : 59 : 11.374 UTC, stop 2025 SEP 07 19 : 24 : 38.918 UTC
Lunar Eclipse Found : start 2026 MAR 03 10 : 25 : 10.975 UTC, stop 2026 MAR 03 12 : 41 : 49.270 UTC
Lunar Eclipse Found : start 2026 AUG 28 03 : 13 : 35.609 UTC, stop 2026 AUG 28 05 : 11 : 50.809 UTC
Lunar Eclipse Found : start 2028 DEC 31 15 : 41 : 23.913 UTC, stop 2028 DEC 31 18 : 02 : 53.871 UTC
Lunar Eclipse Found : start 2029 JUN 26 02 : 02 : 54.446 UTC, stop 2029 JUN 26 04 : 41 : 27.575 UTC
Lunar Eclipse Found : start 2029 DEC 20 21 : 32 : 32.425 UTC, stop 2029 DEC 20 23 : 51 : 28.198 UTC
I bet you didn’t know there’s going to be a Lunar Eclipse on New Year’s Eve, 2028, did you? That’s going to be a wild night!
We could use Spice to find the path of the eclipse or exactly what it will look like at a given time. Take a peek at the SPICE Most Used docs for some ideas on how to go about that. By the way, everything in the SPICE Most Used doc is re-implemented in Blueprints, in the PlugIn source code on GitHub (main branch, in Content/Simple/Blueprints/MostUsed_BPL.uasset.)
Find the time intervals JUPITER is hidden by MOON.
Equinoxes..? Equini?
It’s ‘equinoxes’.
An equinox is that moment where Summer turns to Winter and Winter turns to Summer. It’s that point in time when the Sun passes through Earth’s Equatorial Plane from one side to the other.
gfposc
This sounds like a job for gfposc, the Super Action. (It’s just one of many, though, don’t let it get a ‘big head’.)
This action finds geometric conditions with the observer-target position coordinates. For instance, you could find the point in time when a coordinate such as range between two things is maximum, minimum, equals, less than, more than, etc. The cool thing is the variety of coordinate systems gives a variety to the conditions it can find. Let’s check this out with a few examples.
To find the Equinox we’re going to look for the Sun passing through the equatorial plane, by searching for when it’s Z coordinate in the J2000 reference frame equals zero. This aligns the Z axis with the J2000 north pole, so when Z is 0 the Sun is in the J2000 equatorial plane.
So, Sun is our Target.
Earth is the Observer.
Rectangular Coordinate System in J2000 frame.
And we’re looking for z = zero.
Got it.
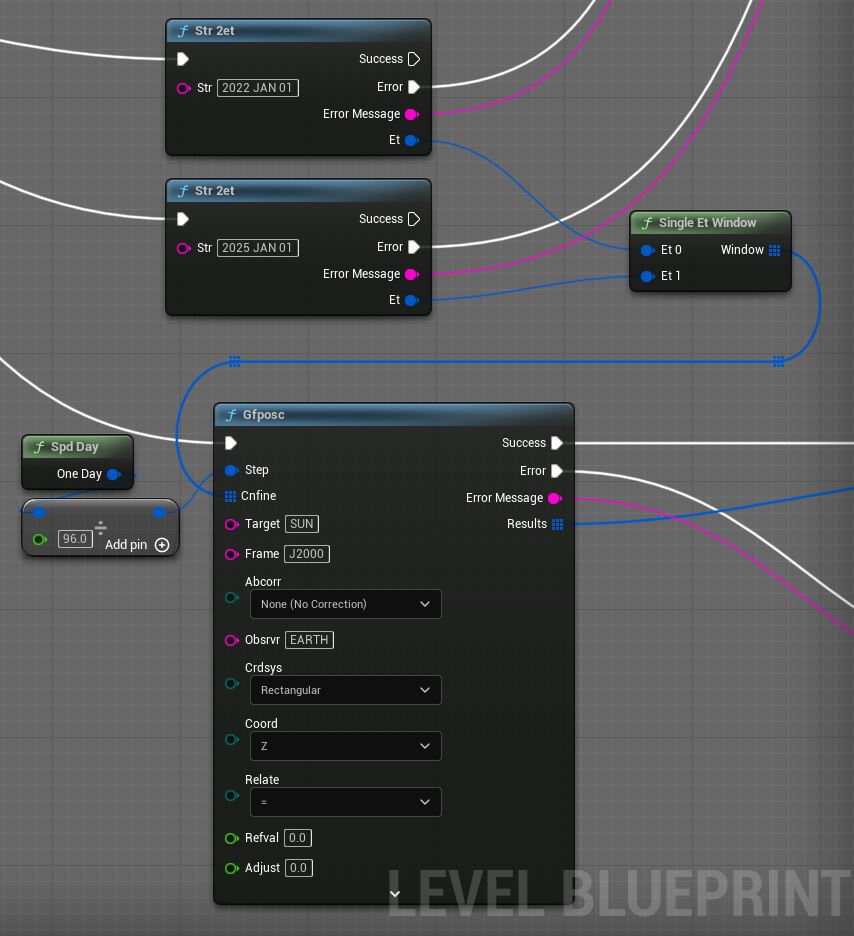
Copy Equinox Finder to Clipboard
And, we get… tada:
Equinox Found : start 2022 MAR 20 22 : 50 : 14.464 UTC, stop 2022 MAR 20 22 : 50 : 14.464 UTC
Equinox Found : start 2022 SEP 23 08 : 39 : 05.864 UTC, stop 2022 SEP 23 08 : 39 : 05.864 UTC
Equinox Found : start 2023 MAR 21 05 : 03 : 29.827 UTC, stop 2023 MAR 21 05 : 03 : 29.827 UTC
Equinox Found : start 2023 SEP 23 14 : 47 : 07.567 UTC, stop 2023 SEP 23 14 : 47 : 07.567 UTC
Equinox Found : start 2024 MAR 20 11 : 07 : 20.522 UTC, stop 2024 MAR 20 11 : 07 : 20.522 UTC
Equinox Found : start 2024 SEP 22 21 : 04 : 21.333 UTC, stop 2024 SEP 22 21 : 04 : 21.333 UTC
Oh, hey, I recognize those dates! They’re the ‘equinoxes’ I used to make fun in grade school because I didn’t understand them. But we all understand what an Equinox is now, right? Indeed, thanks to SPICE + Unreal Engine 5.
Now let’s solve a similar question, but use a different coordinate system.
Solstices : Find the peak of summer
Anyone know what makes Summer, Summer? Anyone?
It’s not when the Earth is closest to the Sun. Nope. It’s when the Sun goes highest in the sky, shining down almost directly on us and warming everything up. The peak is the Summer Solstice. And for those of us on the top half of the globe, that’s when the Sun’s Declination is at a “local maximum”. For those of you on the bottom half of the globe, how do you walk on it without falling off?
This is great! We can solve the mystery of when-is-Summer-at-its-peak without ever going outside again. We can now use SPICE + Unreal Engine. Is there ANYTHING Unreal Engine 5 can’t do?
We’ll be enrolling our old friend, gfposc again. As mentioned, we’re looking for where our Target, the Sun almighty, is at a Local Maximum Declination.
So…
Our Target is Sun.
The Observer is Earth.
Range/RA/Declination is our Coordinate System in J2000.
And we’re looking for a Local Maximum for Declination.
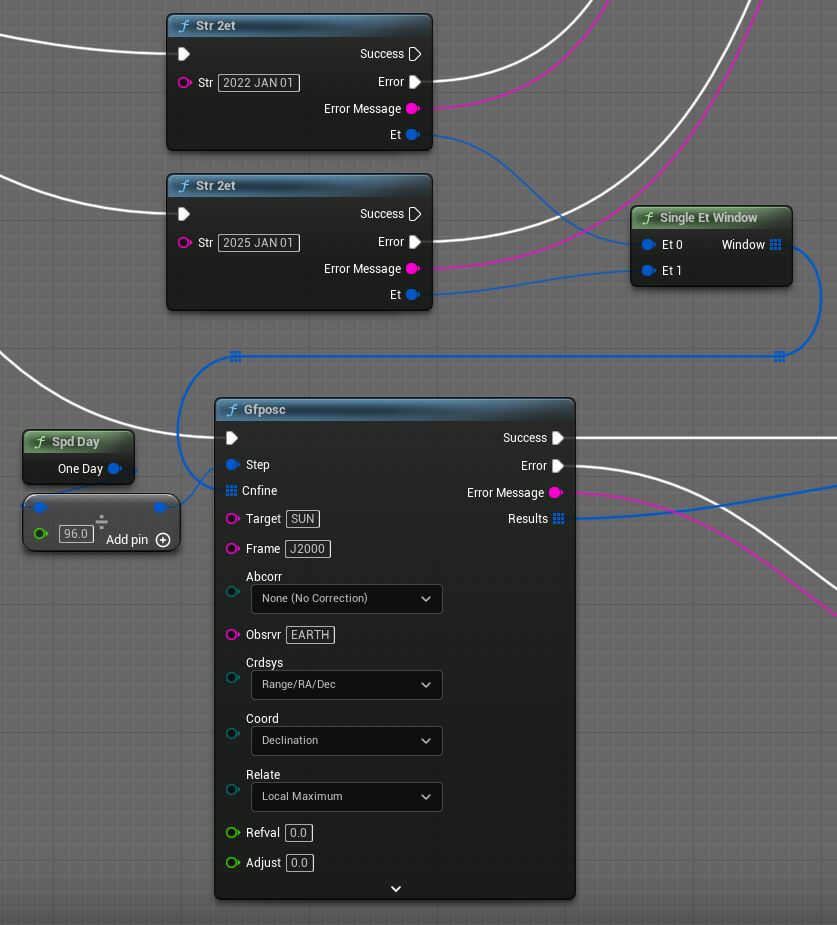
Copy Summer Solstice Finder to Clipboard
The results are reassuring:
Solstice Found : start 2022 JUN 21 16 : 59 : 44.660 UTC, stop 2022 JUN 21 16 : 59 : 44.660 UTC
Solstice Found : start 2023 JUN 21 23 : 00 : 17.653 UTC, stop 2023 JUN 21 23 : 00 : 17.653 UTC
Solstice Found : start 2024 JUN 21 05 : 15 : 41.496 UTC, stop 2024 JUN 21 05 : 15 : 41.496 UTC
Summer will come this year. On the correct day, and at the correct time. That’s the latest news from the Sun, back to you Bob.
To make it a Winter Solstice finder, just flip the Local Maximum to Local Minimum and viola:
Solstice Found : start 2022 DEC 22 05 : 16 : 15.631 UTC, stop 2022 DEC 22 05 : 16 : 15.631 UTC
Solstice Found : start 2023 DEC 22 11 : 04 : 41.047 UTC, stop 2023 DEC 22 11 : 04 : 41.047 UTC
Solstice Found : start 2024 DEC 21 17 : 32 : 45.674 UTC, stop 2024 DEC 21 17 : 32 : 45.674 UTC
Unless, you’re south of the Equator and then it’s a Summer Solstice finder.
A few other Super Actions (Geometry Finders):
| Action | |
|---|---|
gfilum |
Illumination angle search |
gfpa |
Phase angle search |
gfrfov |
Is ray in FOV? |
gfrr |
Range rate search |
gfsep |
Angular separation search |
gfsntc |
Surface intercept vector coordinate search |
gfsubc |
Subpoint vector coordinate search |
gftfov |
Is target in FOV? |
Congrats, you’re doing Astronomy. Next up, Rocket Science. Let’s fly :).
What is the minimum Angular Separation between Jupiter and Saturn in the next year?
What time does Venus rise, at your longitude/latitude?
Animating the solar system with planets, spacecraft, and probably aliens
The MaxQ Plugin comes with samples that demonstrate things like:
- Dynamically sizing planet meshes based on kernel data
- Orienting planets/bodies with MaxQ and SPICE kernel data
- Positioning planets/bodies with MaxQ and SPICE kernel data
- Computing dynamic state and orbits (including NORAD telemetry)
- Querying an online Satellite Catalog for orbital data and updating an actor’s location from it
This page explains how to view the content that comes with MaxQ:
Viewing MaxQ Plugin Content
See this page for a walk-through of the MaxQ Samples:
MaxQ Samples
More samples & tutorials are in progress.
Notes on the C++ API
The APIs in MaxQ are designed to be 1-1 equivalents whether used from C++ or Blueprints. The C++ API that implements the Blueprint functionality is very usable from C++ but not necessarily convenient.
There are some C++ API entry points for common SPICE usages for quality of life improvements in common cases. The C++-specific API is growing over time.
For instance, C++ templates in SpiceMath.h:
template<class VectorType>
inline VectorType MTxV(const FSRotationMatrix& m, const VectorType& v)
Using the C++ specific templates is intuitive:
// using SpiceMath.h templates / API
void foo(const FSDistanceVector& r, const FSVelocityVector& v)
{
  // Transform r, v by matrix transpose
  auto NewPosition { MTxV(m, r) };
  auto NewVelocity { MTxV(m, v) };
Trying the same through the USpice Blueprint Library functions is painful.
// using USpice
void foo(const FSDistanceVector& r, const FSVelocityVector& v)
{
  // Transform r, v by matrix transpose
  FSDistanceVector NewPosition;
  USpice::mtxv_distance(m, r, NewPosition);

  FSVelocityVector NewVelocity;
  USpice::mtxv_velocity(m, v, NewVelocity);
Blueprint actions implemented by UFUNCTION reflection do not support generics/templates/wildcards. Non-generics implemented with reflection are in the USpice Blueprint Library. Generics are implemented as custom K2 Nodes, which assemble macro-instructions from micro-instructions when the Blueprints are compiled. The internal K2 Actions are in the USpiceK2 Blueprint Library. They’re perfectly are callable from C++ but usually more painful than USpice:
// using USpiceK2
void foo(const FSDistanceVector& r, const FSVelocityVector& v)
{
  // Transform r, v by matrix transpose
  auto temp = USpiceK2::Conv_SDistanceVectorToSDimensionlessVector(r);
  temp = USpiceK2::mxv_vector_k2(m, temp);
  auto NewPosition { USpiceK2::Conv_SDimensionlessVectorToSDistanceVector(temp) };

  temp = USpiceK2::Conv_SVelocityVectorToSDimensionlessVector(v);
  temp = USpiceK2::mxv_vector_k2(m, temp);
  auto NewPosition { USpiceK2::Conv_SDimensionlessVectorToSVelocityVector(temp) };
Worse than the USpice version. These are just micro-operations the K2 nodes assemble macro-operations from. They’re not designed for C++ usage. The K2 nodes that do the compilation expansion are in the SpiceUncooked module.
The C++ operators (SpiceOperators.h) exist for convenience:
void foo(const FSDistanceVector& r, const FSDistanceVector& dr, const FSRotationMatrix& m)
{
  auto left{ m * (r - dr) };
  auto right{ m * (r + dr) };
They invoke SPICE for many operations SPICE implements, and implement simple operators inline otherwise.
So, use the C++ specific templates/operators for anything they implement and the USpice/USpiceTypes UBlueprintLibrary static methods for everything else.
You only need to include Spice.h to access the bulk of the C++ API. It includes the types, operators, math, etc.
Visual Studio Setup for Unreal Engine
Epic’s recommended UE 5 Windows Setup
Normally it is more convenient to install MaxQ from the UE Marketplace, but you have the option to build the plugin itself from source.
The Plugin project is on GitHub. This is the project used to build and package the plugin itself.
Join GitHub
A GitHub account is highly recommended:
Join GitHub
The project’s GitHub page
GitHub URL
MaxQ: Spaceflight Toolkit For Unreal Engine 5
Click the Star button in the top right.

This will save the project to your favorites list so you can find it again in 3 months.
Decision: Fork, or clone?
Fork
If you plan to build something with SPICE/UE5, you may wish to create a fork of the repository.

Unreal Engine version updates are not trivial, they break stuff. Also, there’s bound to be churn in the module itself. It is being utilized for an ongoing project and the module is bound to change, and even a simple name change to fix a spelling mistake can break code or blueprints. If you create a Fork you’ll have much more control over your copy of the module’s source code and how/when its updated & merged etc. You may need to make significant changes to the module to serve your own needs as well.
Clone
If you’re just experimenting etc and don’t care about breaking changes, then a clone is fine. You can create a clone, or even just pull down a zip file by clicking the Code button.

If cloning a git repository is new to you, you’ll want to read through the GitHub docs.
The project’s clone URL
https://github.com/Gamergenic1/MaxQ.git
There are two branches, main and toolkit-base.
Branch : main
If you don’t mind having a few blueprints, maps, etc with SPICE examples, etc, go ahead and clone the main branch.
C:\Users\cn>git clone https://github.com/Gamergenic1/MaxQ.git
Cloning into 'MaxQ'...
...

C:\Users\cn>cd MaxQ
In addition to the Source directory you’ll have a Content directory containing Blueprint examples, some spice kernels, etc:
C:\Users\cn\MaxQ>dir

 Directory of C:\Users\cn\MaxQ

 01/04/2022  01:06 PM    <DIR>          Config
+01/04/2022  01:07 PM    <DIR>          Content
 01/04/2022  01:07 PM             1,088 LICENSE
 01/04/2022  01:07 PM             4,578 README.md
 01/04/2022  01:07 PM    <DIR>          Source
 01/04/2022  01:07 PM               274 Spice.uproject
Branch : toolkit-base
On the other hand… if all you want is the code for a barebones code-only plugin, and ONLY code, you can clone just the toolkit-base branch. This makes sense if you have all your own content (planet models, Spice Kernel files, etc) and do not need the code samples. You can limit the clone to this branch by adding options -b toolkit-base --single-branch.
C:\Users\cn>git clone -b toolkit-base --single-branch https://github.com/Gamergenic1/MaxQ.git
Cloning into 'MaxQ'...
...

C:\Users\cn>cd MaxQ
You’ll get:
C:\Users\cn\MaxQ>dir

 Directory of C:\Users\cn\MaxQ

01/04/2022  01:11 PM    <DIR>          Config
01/04/2022  01:11 PM             1,088 LICENSE
01/04/2022  01:11 PM             4,578 README.md
01/04/2022  01:11 PM    <DIR>          Source
01/04/2022  01:11 PM               216 Spice.uproject
Building the Modules
I’ll assume you only cloned the toolkit-base, so we’ll start from scratch and build a few things.
First, take a look at the project in Windows File Explorer. Explorer can be launched by typing start .:
C:\Users\cn\MaxQ>start .
Your directory should resemble mine here:
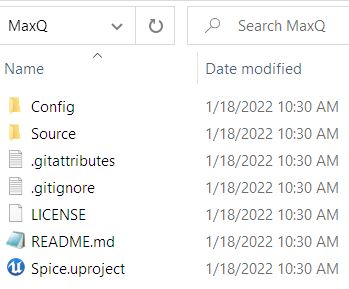
Generating the Visual Studio Solution
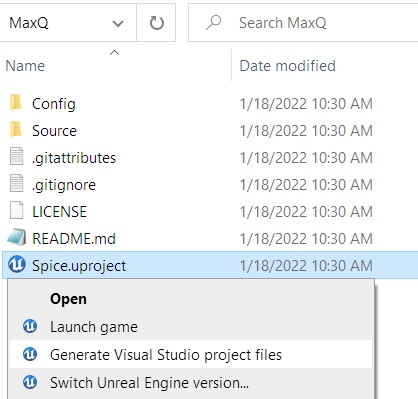
To generate the Visual Studio solution, right click the Spice.uproject file and select Generate Visual Studio project files from the popup menu.
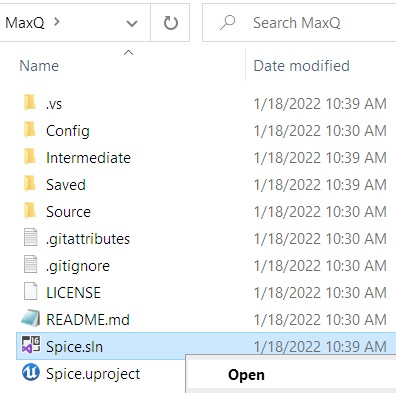
And magically, you’ll have a Spice.sln Visual Studio Solution file.
Ctrl+Shift+B!
Go ahead and open the solution file, then hit Ctrl+Shift+B to build the solution.
Eventually you should land on the magic words:
2>Done building project "Spice.vcxproj".
========== Build: 1 succeeded, 0 failed, 0 up-to-date, 1 skipped ==========
Packaging the Plugin for Distribution
The plugin is packaged for redistribution from the Unreal Engine Editor. You’ll find MaxQ listed in the Plugin Settings, under PROJECT/Spaceflight. Unreal Engine will treat the Plugin as a project-specific Plugin. You can package your version of the plugin for redistribution via the “Package” button on the Plugin’s settings panel.

Thanks for reading this truly Epic post! And, good luck with MaxQ and SPICE!
This article appeared on gameDevTricks.com and has been published here with permission.

